How do you applique a two sided quilt?
You think, think, plan, think some more, plan again and then finally jump in and do it. That kinda describes the process I went through when contemplating the idea of embroidering an identical tree on both sides of a quilt.
Idea #1
- adhere light weight fabric adhesive to the back of two pieces of fabric for the tree trunks
- draw the tree trunk onto the fabric and cut out two identical trees
- adhere the tree to one side of the quilt and baste in place
- adhere the tree on other side and then machine embroidery through all layers of the quilt and tree
- machine quilt the details onto the tree
- Concern – machine quilting will cause the quilt to be “flattened” and lining up the edges of the tree on each both sides of the quilt would be difficult
Idea #2
- baste stitch the outline of the tree onto the quilt
- cut out fabric to match the tree
- use needle turn embroidery to stitch the tree onto each side of the quilt
- machine quilt the details onto the tree
- Concern – it might be difficult to control the amount of fabric involved while doing hand embroidery
Idea #3
- pin large pieces of the tree fabric to both sides of the quilt
- machine quilt the tree details onto the tree
- trim the fabric approximately 5/8″ – 3/4″ away from quilting details
- use needle turn embroidery to stitch the fabric to the quilt
- This was ultimately the idea I decided to use for the trees, sun and moon

Daytime detail:
I decided to hand applique leaves onto the daytime side of the quilt. To do this, I pinned pieces of green fabric onto the quilted tree. Then I machine quilted the outline and veins of a leaf onto each piece of fabric. After cutting around each stitched leaf, I used needle turn embroidery to secure the edges of the fabric.
Nighttime detail:
I did not want to use the same technique on the nighttime side of the quilt. So, after completing the daytime side, I used the quilting lines as a guide to paint faint green fabric dye onto the leaves and then hand embroidered outlines around the leaves.


Unfortunately while quilting the leaves onto the daytime side, my long arm machine handles fell off the machine while I was working on a leaf. When this happened, the needle broke and the broken needle tore the fabric through all layers of the quilt. This picture shows that even on the backside of the quilt, the broken needle tore the fabric. I was really bummed!
To fix the tear, I could applique a leaf onto the daytime side. But, how do I fix the tear on the nighttime side. I could applique leaves on this side as well. However, that was more applique then I really wanted to do. And, I had really wanted the two sides of the quilt to use different techniques. This was really frustrating.
Ultimately, I decided to add a bit more detail to the quilt. By appliqueing an owl on the nighttime side and a cardinal to the daytime side, I was able to repair the quilt and no one can even tell that the quilt was torn.

A good repair and some nice details for the quilt! I have added more details to the quilt that were really fun to do. I will post about those soon.


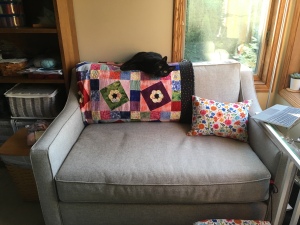
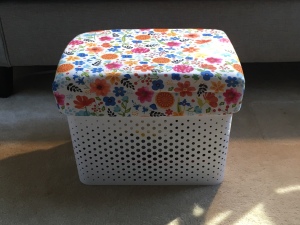 Lately, I have been doing a lot of hand stitching – applique, embroidery and quilt binding. When hand stitching, I like to have a place to rest my your feet higher than the floor in order to make myself more comfortable. Unfortunately this was something that I did not have in my new craft room.
 Wanting to add one, I starting looking around the room to see where I could store the footrest when it was not being used. The size of a place to stash the footrest would be the limiting factor for the size of the footrest itself. With the room maximized for storage, I was not finding a good spot to keep one. So, I put off purchasing one.
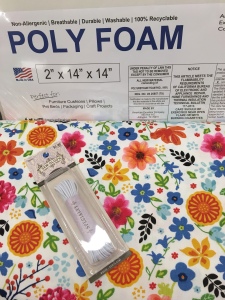


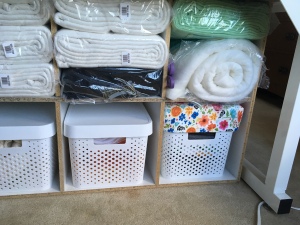 Now I have a colorful and comfortable foot rest. When not in use it fits nicely into the original storage spot without taking up any space in my room.