In honor of the release of Star Wars: The Rise of Skywalker, I am posting this short video I made a few years ago.
Smile Wars: May the Floss Be With You
Enjoy!
Creating a Legacy though the things I love – Fiber Arts, Flora, Food, Faith and Fun

In honor of the release of Star Wars: The Rise of Skywalker, I am posting this short video I made a few years ago.
Smile Wars: May the Floss Be With You
Enjoy!
Last December during a longer lunch break, I walked by a uniform store. Glancing in the window of the store, a couple items caught my eye. Displayed high on one of the walls, I saw long sleeved red scrub jackets. On another display below the jackets were bright green scrub pants. When I saw them, it made me think – Grinch. When I went into the store, I discovered that the displays were not directly adjacent, it was just an illusion created by looking through the window. That visual image, however, gave me a creative idea for work, so I purchased a red scrub jacket and a pair of green pants. I have worn both of these items at work, but not together. Now that the Christmas season is here, it was time to put them together.
To create the costume, I designed an digital embroidery pattern (using Art and Stitch) based upon a Grinch face in a child’s coloring book. The face was embroidered onto green fleece and sewn, like a visor, inside the front edge of a pre-made Santa hat. To complete the costume, I even found matching green gloves and red Poinsettia shoe on Amazon.
Wearing the costume at work has proven to be a good behavior management strategy. For the past week, I have had great patient and parent cooperation, even with patients who have not been good in the past!
 A few days after I made my visor, I was shopping at Target. When walking past the boy’s clothing section, I noticed some green gloves that were the exact shade of the fleece I had used. Since I had excess fleece, I purchased two pair of gloves and made a couple Grinch hats. To complete the winter wear sets, I embroidered a triple heart (because, according to the story, the Grinch’s heart grew three sizes), and made neck warmers. I will be donating these two sets of “Grinch Gear” to the Hats and Mittens collection next year.
For holiday fun, I decided to make some Grinch treats to share at work and with my sons. Here are a couple recipes:

Grinch Shortbread Cookies (makes 36)
1 cup butter, room temperature
1 cup granular sugar
1 egg
1/2 tsp vanilla
1/4 tsp salt
1 1/2 cup Gluten-free flour
1 cup Almond Flour
green food coloring
Red Jolly Rancher candies
Directions:
Preheat oven to 350 degrees F. Line a 9×13-inch baking pan with parchment paper.
Beat together butter and sugars until creamy. Add vanilla, egg and food coloring and mix until creamy. Whisk together flours and salt. Gradually mix dry ingredients into batter. Chill for at least one hour. Roll out dough to 1/4″ on a lightly floured surface. Cut out a larger heart with a small heart in the middle. Place a Jolly Rancher in the middle heart hole. Bake for 10 minutes. Cool completely before removing from parchment paper.

Grinch Fur – aka Haystacks (makes 36)
12 ounces dark green Candy Melts
12 ounces vibrant green Candy Melts
1 1/2 cups peanuts
12 ounces Chow Mien Noodles
Candy Hearts
Directions:
Place Candy melts in an 10 cup microwave safe glass bowl. Microwave approximately 2 minutes. Stir well until all pieces of candy are melted and blended together. Stir in peanuts and Chow Mien Noodles. Place by spoonfuls onto waxed paper and top each with a candy heart. Refrigerate until set. Store in an airtight container.
Grinch Poppers (see my original post 12-22-18)

Again this year, my dental office participated in the collection for the Hats & Mittens Organization. The boxes of donated items were picked up on Thursday. About 150 items were donated at our three offices.
Like last year, I knit several items to donate. New this year, several of the scarves that I included in the sets were woven. The hats and scarves were combined with purchased gloves to make winter sets. Hopefully these sets will keep the children and teens who receive them nice and warm this winter.
Linen Stitch Scarf and Swirl Knit Hat
Ombre Teal to Brown Knit Scarf and Hat
Dotty Stitch Hat and Cowl
Woven Scarf with Cable Knit
Woven Scarf with Swirl Knit Hat
Woven Scarf / Ribbed Knit Hat
Woven Scarf / Ribbed Knit Hat
Woven Scarf / Ribbed Knit Hat
Rib Knit Hat and Cashmere Scarf
Dotty Stitch Hat and Striped Scarf
Boa Yarn Knit Scarf and Hat
As a special treat, I am including the recipe for the Reindeer Brookies I made today. Kinda fun and very tasty!
Reindeer Brookies (makes 36, plus scraps from cutting triangles)
 Cookie Base
1/2 cup butter, room temperature
1/3 cup brown sugar
1/3 cup granular sugar
1 egg
1/2 tsp vanilla
1/4 tsp salt
1/2 tsp baking soda
1 cup flour
1 cup chocolate chips (I used Andes Candies chips)
Brownie Layer
1/2 cup butter, melted
1 cup granular sugar
1 egg
1 tsp vanilla
1/4 cup Triple Cocoa Blend
1/4 tsp baking powder
1/8 tsp salt
1/2 cup flour
Chocolate Frosting and Decorations
1/4 cup butter, softened
1/4 cup Triple Cocoa Blend
2 Tbsp milk
1 tsp vanilla
1 1/4 cup powdered sugar
Pretzels, broken
Mini M & Ms, red and brown
Sugar eyes
Directions:
Preheat oven to 375 degrees F. Line a 9×13-inch baking pan with parchment paper.
Beat together butter and sugars until creamy. Add vanilla and egg and mix until creamy. Whisk together flour, salt and baking soda. Gradually mix dry ingredients into batter. Stir in chips. Spread dough into bottom of the pan.
Beat together butter and sugar until creamy. Add vanilla and egg and mix until creamy. Whisk together flour, cocoa, salt and baking powder. Gradually mix dry ingredients into batter. Spread batter evenly over the cookie dough. Bake for 20-25 minutes. Cool completely. Once cooled, cut into 3″ x 1 1/2″ triangles.
Beat together butter, cocoa, milk and vanilla until creamy. Add powdered sugar slowly, beating slowly at first until incorporated, then beat at medium high speed until frosting is smooth and creamy, about 1 minute. Spread over cooled brookies. Place pretzel pieces to look like antlers. Add sugar eyes and noses to complete the decorating of the reindeer.
For the past couple of years, I have been thinking it would be nice to learn how to weave. I have always been fascinated watching the weavers at the Minnesota State Fair and at different craft fairs.
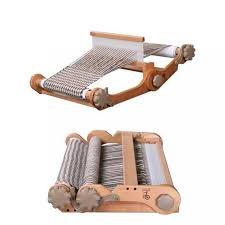
Do I really need another craft? Well, no. However, I have a drawer full of yarn scraps leftover from various projects. The scraps are too short to make a hat or scarf, but might be put to some other use. I thought that weaving could give me a good way to use them up.
So, this summer I purchase a rigid heddle loom (Knitter’s Loom) and spent a couple hours watching videos on-line before giving it a try. I did some weaving as a child, but that was years ago and things have changed since then.
 I decided to start with just a straight tabby weave and see how well I did. The first project I did, I used up leftovers of a solid royal blue yarn for the warp. Then I used another royal blue for the weft. The scarf turned our really nice. And, the best part was how quickly it was completed.
Being my first project, it took me about an hour to correctly warp the loom. Once that was done, the weaving took only three hours. I removed the yarn from the loom, tied knots in the warp ends and had a lovely 60″ scarf completed.
Continuing with tabby weave, I wanted to see how different yarns would turn out.
Three carves with solid warp and variegated yarn for the weft:


Two scarves with solid warp and eyelash yarn for the weft:


I also used made a scarf with various scraps of red, white and blue yarn used for the warp and solid weft of white cashmere yarn (also shown in the Independence Day post).
After doing a straight tabby weave, I decided to try a plaid pattern. Using some glitter yarn scraps from a hat I had knit, I warped the loom in a pattern and then wove the weft with the same yarn in color sections.
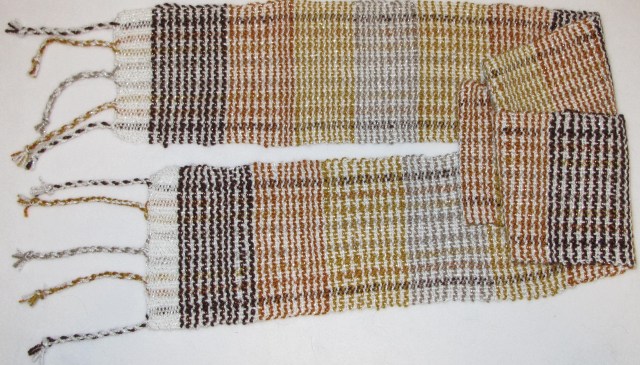
This new craft is proving to be a lot of fun. I like the woven scarves better than knit or crocheted scarves because they do not stretch out of shape.
The first scarf I made was given to a really good friend for her birthday. The two eyelash yarn scarves and the patriotic scarf I am keeping for myself. The rest of these scarves will be put together in sets with a hat and gloves and donated (more about that on another day).
Weaving is so much fun! I am really going to enjoy using up some of my yarns.
 Just over two weeks ago, my father fell and suffered a major head injury. This injury ultimately led to his passing on November 21st (view his obituary). The rapidity in his decline was not expected. My dad had several major health incidences over the past years (cancer, heart disease, strokes, uncontrolled diabetes, etc) from which he always bounced back. Having been through so many of these, his quickly succumbing to the effects of the fall was very surprising to me.
As I prepare for his memorial service today, I have been reflecting back on my years with him.
Growing up, my father was not an easy man to live with. However, he did have a large impact on the person I am today. As a child, I would often retreat to a hidden quiet spot in the basement of our home to avoid his unwanted words and action. In this space, I would try to be as quiet as possible and thus kept several books, including some of our encyclopedia set, to occupy my time. My time was spent learning new facts and information, which ultimately helped me succeed in school. To this date, I don’t think my father every knew that I had a hidden spot high on the storage shelf behind several large boxes.
As a high school junior, my father’s personality contributed to my decision to graduate from school a year early and attend college as a seventeen year old. There were many things that my father had said and done that were inappropriate. My life’s goal was to personally and professionally excel and make my own path that would be different from the path my father would have preferred. College seemed an excellent way to accomplish this.
While in graduate school and for several years after graduating, I pulled away from my family, focusing instead on my career and raising my own children. The things my father had done were wrong and I wanted no part of it.
However, as an adult, I have learned that we all have the ability to live a lifestyle of forgiveness. The depth of forgiveness we have received in Jesus can be the foundation for our own love and forgiveness. In order to love to greater depths, we must continuously reflect on God’s overwhelming forgiveness and mercy to us.
In Him we have . . . the forgiveness of sins . . . Ephesians 1:7
I realized that I cannot change the past. But, I could forgive my father and create a new future for us. So, over the past ten years, I have rebuilt a relationship with my father. Our relationship was not a strong father-daughter relationship. But, I did love my father, spent time with him and will miss him.
As most of my friends and family know, I like to try new ideas for quilts. Many of these are made and then given away to charities. Last winter I learned that the charity I had been donating to changed their donation policy. In order to donate an item, I needed to donate one for ever person living at their housing location. That meant I needed to make 24 quilts before I could donate them. That would be a difficult task for me to accomplish.
Fortunately, last December while watching the evening news, I saw a news article about an organization that made beds for children who do not have a bed and are usually sleeping on the floor. When I learned I needed to find a new place to donate quilts to, this organization came to mind.
 Sleep in Heavenly Peace (shpbeds.org) is a national organization “dedicated to building, assembling and delivering top-notch bunk beds to children and families in need”. I went on-line to learn more about the organization. What I learned was when the beds are delivered, the children are also given a mattress, pillow and bedding (including a comforter or quilt).
This, I thought might be a good place to make quilts for. And, since the beds are for children, I could make all kinds of fun kids quilts! After contacting them, I started setting aside quilts to drop off. A few days ago, I delivered the twelve quilts that I have made this year. Hopefully there will be a dozen kids who enjoy these quilts.
Many of the quilts I have already written about in previous blog posts. But, here are a few photos of the ones I have not already posted about.
A flannel quilt (front and back):


Another flannel quilt (front and back):


An airplane quilt: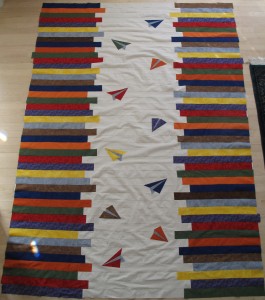
Diamonds:
Patriotic Bargello: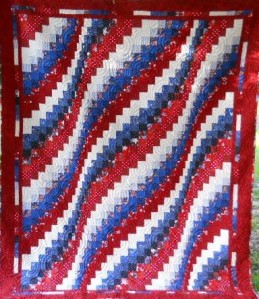
If any of my friends have quilt tops that they would like to donate, I will gladly quilt them on my long-arm machine and donate them to SHP for you. Just contact me.


Over the summer, we replaced the carpeting in our home. The original carpet was over 30 years old. And, while it had held up well, it was time for an update.
I realized, when preparing for the installers, that replacing carpeting is nearly as bad as moving to a new home. Everything needed to removed from the floors. This included all of the furniture in the rooms, as well as things on or near the floor in the closets. Logistically it was a bit overwhelming at times. However, now that the new carpet is installed, it is nice to have updated the look of the house.
 In the process of moving things, my husband had a pile of jeans to donate. Rather than taking them to Goodwill, I decided to make a denim quilt instead. This was something I had thought about doing for the past couple of years. And, now that I had some worn, but not holey, denim to work with I decided to give it a try.
To make the quilt, I settled on a quilt-as-you-go technique. My concern was that quilting such a heavy project would throw the timing of my long-arm machine off. So, this technique would completely avoid using my quilting machine
To make the quilt, I cut out 9″ denim circles. Out of each pair of jeans, I was able to cut 12 circles. Needing 154 circles, I used 13 pair of jeans. Next, I drew a 6″ square on the back of each piece of denim to help with lining up and sewing the pieces together.


After each row of 14 circles were sewn together, I added a six inch squares of quilt batting and flannel to the back side of the denim (the side that would have been inside the pair of jeans).


This was a great way to use up a lot of scrap pieces of batting. However, in retrospect, the quilt was really heavy and the batting was probably not necessary.

After pinning the flannel and batting in place, I used a zig-zag stitch to sew down the raw edges of two sides of the denim. A total of eleven rows were sewn.

Before sewing the rows together, I used a zig-zag stitch to sew down the raw edge of one side of two separate rows. These would become left and right side of the quilt.

Next, I sewed the rows together, zig-zagging the raw edges of each circle after they were sewn.
What I didn’t realize is how heavy the quilt would get by the time I was halfway done sewing it together! The next denim quilt I make will definitely be done using a different method.
I will be donating this quilt to a charity (Sleep in Heavenly Peace). It should provide a unique quilt for a young boy or girl to stay really warm this winter.
Earlier this summer, I was sitting in my sunroom having my morning cup of coffee. On a sunny day, this is a relaxing place to sit. Looking around the room, I thought it would be nice to add some more color to the room, possibly suncatchers in the windows. When I counted the windows, I realized that there are twelve of them and I thought that something related to each month of the year would be nice to try and settled on a flower for each month.


 To make the suncatchers, I used COE 96 clear glass cut 2″ x 6″ as the base. Only a single layer was used and the glass was fused at 1350 degrees, a temperature between tack fuse and contour fuse to give a slight softening to the edges of the glass.
For the stems, I used green noodles and stringer. To create curves in these, the glass was heated in the flame of a soldering torch and allowed to bend before placing on a heat resistant tile to cool.
For the flowers, a variety of techniques were used. Some flowers were just pieces of cut glass. For the Lily of the Valley, frit balls were first created by heating to full fuse small pieces of glass. For the delphinium, I used coarse frit. For the gladiolus, I used fine frit. And for the marigold, pieces of tangerine glass were dipped in glass tack and then dipped in yellow fine frit to create the light colored tips.
Here are some of the pre-firing photos:


And, the photos hanging in my windows:


The Minnesota Dental Foundation held their annual One Smile Gala last Friday evening. The gala was an evening raising funds for the Foundations outreach to the under served in the state. It was a fun evening seeing colleagues and friends from around the state.
The vision of the Minnesota Dental Foundation is to eliminate unmet oral health needs in Minnesota. The Foundation raised over $1M in 2018. These funds were used for the Minnesota Mission of Mercy, Give Kids a Smile, and several other programs.
Along with attending the gala, I also donated a few glass items to the silent auction.


These garden flowers were well liked and raised a couple hundred dollars for the foundation. Perhaps next year I will do some other glass garden art for the auction.
 Of the four quilts that I entered this year in the Minnesota State Fair, I have described three of them previously. Now that the busy summer schedule has settled down, it’s time I describe the fourth quilt I entered.
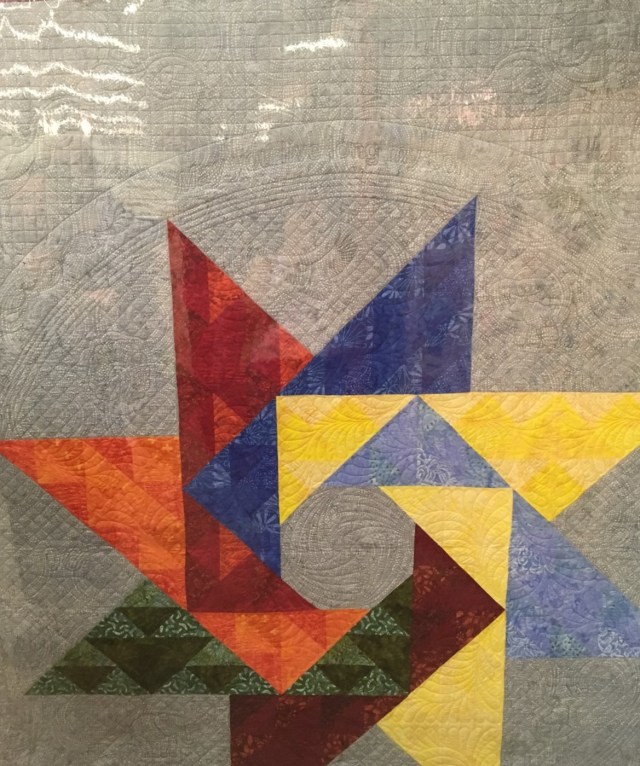
This quilt was made a the request of someone I know. He asked if I could make a quilt for his new grandson. My response was “sure – what kind of quilt was he thinking of”. Further conversations helped focus my design ideas. He said he wanted the quilt to be twin sized and to incorporate the cultures of his son, who is Swedish, and his daughter-in-law, who was adopted as an infant from India. This sounded like a fun quilt to work on.

First, I needed to figure out the main piecing theme of the quilt. After sending several ideas to him, he selected a large eight pointed star pattern. My design incorporated blue and yellow points for the Swedish half of the star and red, orange and green points for the India half of the star. At the top of the quilt, one of the blue points was adjacent to a red point to bring the two cultures together in an American section of the quilt.
 After selecting several batik fabrics, I started piecing the quilt. While piecing, I was drawing out ideas for the quilting. I wanted to incorporate, with just thread, some images that reflected the heritage of the child. By using thread and not applique, the main design of the quilt would not overwhelmed by too much going on with the fabric. For inspiration, I sought some advise from several friends who are from India and Sweden.
For the Swedish heritage, I stitched out a moose, a fox and some rosemaling. For the India heritage, I stitched out an elephant, a peacock and some paisley patterns. For the American heritage, an eagle was stitched. Each of these designs were stitched out in the background sections between each point of the star with a thread color slightly darker than the fabric. In the other three sections, I put the child’s birth month, date and year. The designs were surrounded by a diagonal hatch fill in the same color as the fabric to help the images show better.


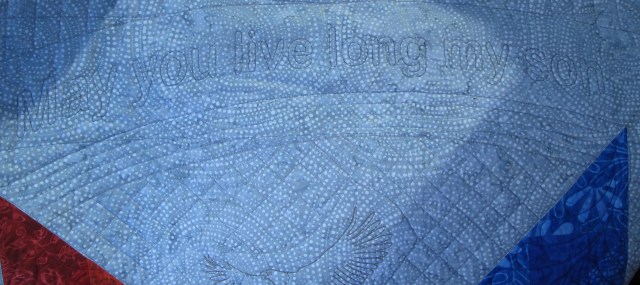
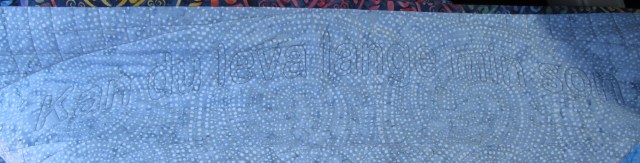
Around the star, several circles was sewn. Between the lines of the outer circles, I thought it would be nice to include the child’s name – so that was sewn in the bottom section of the circles. To fill the rest of the circle, I once again consulted my friends. I thought perhaps there would be a phase that was specific to each culture that I could stitch out. I asked my friends if they could give me a list of three phrases that might be said of or to a young child, or more specifically a young boy. When I compared the lists, I was surprised to find one of the phrases was on both the Swedish list and the India list. That phrase “May you live long, my son” was included in the quilting. The phrase, in English, was stitched at the top of the circles on the quilt. Then, on the Swedish side of the quilt, it was stitched in Swedish. And, on the India side of the quilt, it was stitched in Hindi. To fill in the space between the name and phrases, paisley patterns were stitched.

The rest of the background was filled with some stitching to replicate Scandinavian rosemaling. This was then highlighted with some straight hatch fill.
I had not intended to enter this quilt in the fair. However, while working on it, the design was coming together so nicely that I asked permission to enter it. My quilt entry was named “Blended Cultures – Swedish and Hindi heritage in an American Boy” and was enter in the Commemorative Quilt Category. The blue ribbon the quilt was given was a nice surprise for a “last minute” entry. This was such a last minute entry that I forgot to take some close up pictures of the finished quilt before dropping it off at the fair. And, the day I picked it up from the fair, I had promised to deliver it to the family that it was made for. So, some of my photos were taken rather poorly while in my car. But, alas it’s still a really fun quilt and I am glad I had a chance to make it.

