

Author: Erickson's Heirlooms
I am a retired pediatric dentist. While I enjoyed working with my young patients, I am really enjoying the freedom of retirement. With my varied hobbies, I hope to leave a legacy by the things I do and say.
I hope to have an impact through:
Fiber arts (quilting, sewing, knitting and crocheting)
Flora (flowers and gardening)
Food (cooking and baking)
Faith
Fun
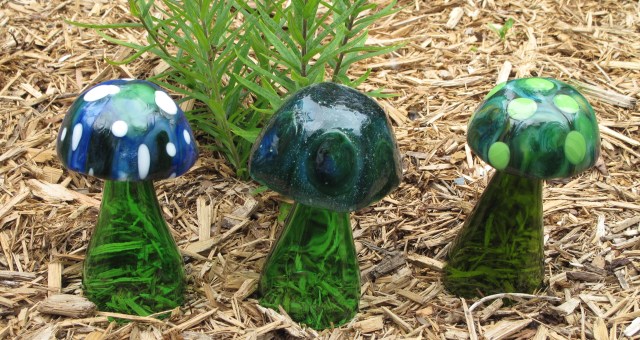
Fused Glass Mushroom


I have accumulated a long list of ideas for glass projects that I want to try. Having recently replaced the landscaping in my front yard, I decided to try one of these ideas and add some new “art” to my perennial garden.
Fused glass mushrooms are one of the fun ideas that was on my list. The ones that I have seen, the caps were created using pre-made patterned glass that is cut into a circle and then slumped into the shape of a mushroom. For the stems, some were made with blown glass, others with PVC pipe. But, the ones that I really liked were made with the top half of recycled bottles.
After completing a few pot melts, I decided that these would make great mushrooms. Also, by using scrap glass and recycled bottles, this would be an inexpensive craft.
I thought it would be fun to add some spots to the mushroom caps. To make these, I first made some glass pebbles. The nice thing about glass is that it naturally settles to a quarter inch in thickness and prefers a round shape. So, small pieces of glass were stacked and full fused.


These pebbles were then placed on top of one of my pot melt discs and full fused again.


After cooling the disc was placed on a slumping form. For some of my mushrooms, I used a stainless steel form.


For others, I used a clay form. I prefer the shape of the mushroom made with the clay mold, but the others turned out very nice as well.


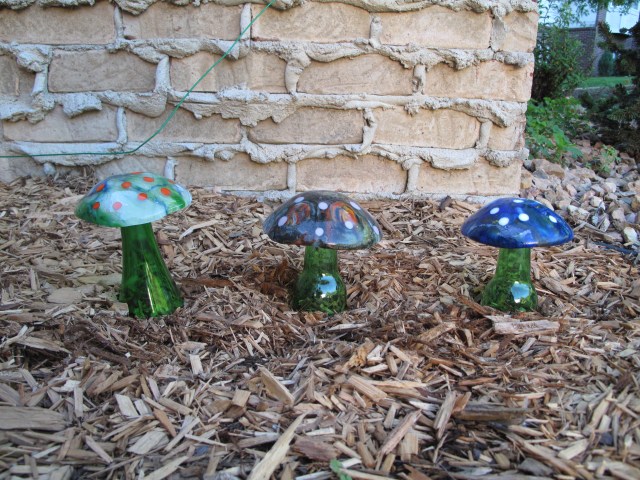
To make the stems, I used a Kinkajou bottle cutter to cut the bottom off of wine bottles and sparkling cider bottles.

As you can see below, both types of bottles look nice. However, I prefer the sparkling cider bottles because the nice green color is more visible in the mulch of my flower garden.

Pot Melts
I’ve been accumulating lots of bits and pieces of glass from my many fused glass projects. What to do with these scraps? After looking at ideas on-line, I found several blogs that talked about a technique called pot melting and decided to try it.


A Pot Melt involves placing scraps of glass in a clay pot with holes in the bottom. A terra cota planting pot is the simplest form of a pot for melting glass inside the kiln. When the glass is heated to a high enough temperature, the glass will flows from openings in the bottom of a clay pot onto the kiln shelf below. This flowing thick syrupy glass will result in unique spiral or circular patterns.

For my pot melts, I found that a terra cota pot was too tall for my kiln. I tried to drill a hole in a terra cota pot base, but both times I tried the base cracked. So, instead I purchased a clay pot made for pot melting. The pot I selected had seven holes in the bottom and was purchased from Bonny Doon Pottery.
This pot was placed over a stainless steel ring lined with fiber paper. Clear glass scraps were placed inside the ring before the clay pot was positioned over the ring.


After firing to 1600 degrees and holding for 90 minutes, the glass flowed through the holes leaving behind a thin layer of glass in the mold and a nicely swirled circle of glass below.


Lots a glass pieces – several pot melt attempts!


Now, to make these useful – that will be my next posting.
The Results:

Veggie Tart
 My Facebook news feed is generally filled with fun things that my friends are doing. When a “Suggested Post” (aka – annoying ad) shows up, I usually click Hide Ad because I hate seeing them.
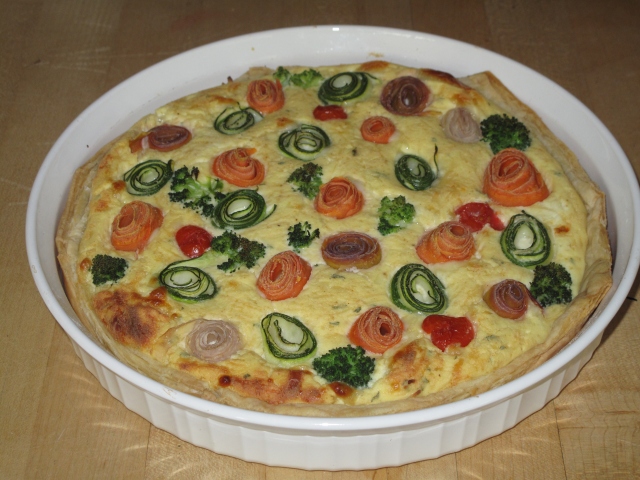
Every once in a while, however, there is an ad that I like. That was the case recently when the Food Network had a video for “Rainbow Rose Veggie Tart” that showed up on my new feed. It sure looked tasty, so I wanted to give it a try. The original recipe can be found at Food.com.
After reading some of the reviews, I did decide to alter the recipe. The two main criticisms of the recipe were (1) the veggies were too stiff and (2) the cheese tart was too bland.
To reduce the stiffness of the vegetables, I precooked them in water for six minutes in the microwave. This resulted in soft, easy to roll veggie slices. To change the flavor, I decided to add some of the spices that I normally use when making quiche. The spices added a nice taste to the tart. The original recipe called for varied colored carrots. However, I found that the purple carrots lost their color in the precooking. Next time, I think I will try eggplant instead of purple carrots. I think they will keep their color better and add some additional flavor to the recipe.
So here is my version of the recipe.
Veggie Tart
1 sheet Puff Pastry
15 ounces Ricotta Cheese
1/2 cup shredded Mozzarella cheese
3/4 cup shredded Parmesan Cheese
2 eggs, beaten
1/2 tsp dry mustard
1/2 teaspoon chopped parsley
1/2 teaspoon garlic powder
1/2 teaspoon onion powder
1/4 teaspoon paprika
1/4 teaspoon oregano
carrot, peeled
zucchini
broccoli
Enjoy!
Split Blocks – Fun and easy quilt piecing
Sometimes ads come up on my Facebook news feed that catch my attention. That happened recently with some fabrics. The offer was for pack of 5″ charm square, 102 pieces in all. The colors looked so nice and the price was excellent. So, I purchased a set. I had no idea what I was going to make with them, and I certainly didn’t need any more fabric. But, they were just too pretty to pass up.
Once they arrived, I started thinking about the many quilt patterns that I want to try. Since the pack was small 5″ squares, I knew that I couldn’t do anything really fancy with them. So, I decided to try some “split block” ideas.
Split block techniques involve sewing squares of fabric together, either jelly rolls, 5″ charms or other sizes, and then cutting them along different lines and/or angles to make new blocks.

The first idea I tried was an Interrupted Four Patch. This pattern involves sewing the charm squares alternately with a background fabric. 
The sewn piece is then cut into strips 1/3 and 2/3 of the size of the blocks. A contrasting fabric strip is then sewn between each horizontally cut strip. This is repeated with vertical strips, borders added and the quilting completed.

The nex t idea I tried was the “Twister”. This pattern also involved sewing the charm squares together alternating with a background fabric.
Then the sewn piece is cut at an angle with a template, twisted to make pinwheels, and sewn together.


There are templates in a variety of sizes available for this quilt pattern. But, I really don’t need more templates, so I just drew temporary lines on my 4″ square template and used that.
For this quilt, I did not have enough fabric to make as many pinwheels as I needed. So, I decided to add pinwheels with quilting. Kinda a fun way to continue the pattern to a larger size.
Some interesting blocks to try in the future:
- Disappearing four patch
- Disappearing nine path
- Fence Rail
Fused Glass Cats (and one Dog)
As promised – a few more cats….


and a dog.
Doesn’t really look like our yorkie, Duke – but, it is still kinda cute.
Fused glass Art
There are many forms of glass art. Fused glass is one of them. The basic idea behind fused glass is that art objects are created by melting glass in a kiln. Unlike stained glass, fused glass has no “lead lines”. Unlike blown glass, the learning curve is relatively short and projects are easier to make. The precise origins of glass fusing techniques are not known, but there is archaeological evidence that the Egyptians were familiar with these techniques. While other glass techniques enjoyed a revival during the Renaissance, fusing was largely ignored during this period. Fusing began to regain popularity in the U.S. during the 1960s.
A few years ago, I took a class to learn about fused glass techniques. It was a really fun class that made me want to be able to make more things. Months later, when a glass supply company had their kilns on sale, I decided to invest in getting one. Fused glass has since become another hobby that I like to pursue. I have enjoyed creating many nice pieces of fused glass art over the past couple of years. I will, over time, try to post some of these previously made items.

Recently, I tried a new glass idea. The birthday of my sister-in-law, Ruth, gave me an excuse to make something kinda fun. Ruth likes cats. But, unfortunately she is allergic to them and can’t have any cats of her own. So, I decided to make her an allergen-free cat. I selected blue glass to match the colors in her home.
This cat turned out so cute, that I decided to make some more.
more.
I next tried some burgundy colored glass. These almost look like foxes.
After that, I decided to try to make some cats that looked like some of our pets.

After making these, I realized that I wanted to make some more pets. A little bit of time on-line and I found some clipart images that I want to try.
The kiln will be busy again!
What if?

My husband treated my younger son and I to Easter Brunch today. While eating, our son asked his dad how is day was going. His response “It’s the best day of the year!”
That is the truth on this Easter Sunday. It’s Resurrection Sunday and Jesus is alive! We have hope in Jesus Christ and that hope makes this truly the best day of the year. The empty tomb of Jesus that gives us HOPE!
HOPE of forgiveness
HOPE of peace
HOPE of assurance
HOPE of Heaven
Hope of eternal life.
But, for many, they have walked away from that hope. To them, I suggest to ask yourself “What if?” What if your wrong?
What if? Lyrics by Nichole Nordeman
What if you’re right?
And He was just another nice guy
What if you’re right?
What if it’s true?
They say the cross
Will only make a fool of you
And what if it’s true?
What if He takes His place in history
With all the prophets and the kings
Who taught us love and came in peace
But then the story ends
What then?
But what if you’re wrong?
What if there’s more?
What if there’s hope
You never dreamed of hoping for?
What if you jump?
And just close your eyes?
What if the arms that catch you
Catch you by surprise?
What if He’s more than enough?
What if it’s love?
What if you dig
What if you dig
Way down deeper than
Your simple-minded friends
What if you dig?
What if you find
A thousand more
Unanswered questions down inside
That’s all you find
What if you pick apart the logic
And begin to poke the holes
What if the crown of thorns is no more
Than folklore that must be told and retold
But what if you’re wrong?
What if there’s more?
What if there’s hope
You never dreamed of hoping for?
What if you jump?
Just close your eyes?
What if the arms that catch you
Catch you by surprise?
What if He’s more than enough?
What if it’s love?
You’ve been running
As fast as you can
And you’ve been looking for a place
You can land so long
But what if you’re wrong?
What if you jump?
And just close your eyes?
What if the arms that catch you
Catch you by surprise?
What if He’s more than enough?
What if it’s love?

Crocodile Flower Crochet Pillow with Crocheted Daisies on the back.
Every bed runner needs a nice decorative pillow to complement the design. Usually, for me, this means making a pieced and quilted pillow to match. This time, however, I thought it would be nice to try something different. So, I settled on
crocheting a pillow.
crocheting a pillow.
The nice thing about crochet is that I can take it with me to work or when running errands. That way if I am stuck waiting, I can work on my project.
When I first learned the crocodile stitch (February 9, 2016 posting) , I really liked the way it looked. And, this stitch seemed to me that it would match my daisy runner very well. Using some yarn in my stash, I started working on this. When it was done, I thought it was a nice complement to my quilt.
But, what to put on the back?
Well, it’s a daisy bed runner. So, why not try some crocheted daisies. I did an on-line search for a daisy pattern but was unable to find one with leaves behind the petals. So, why not make up my own pattern. With a little trial and error, using some features of the crocodile stitch, this is what I came up with.

And, here is my pattern:
Supplies:
E hook (smaller hook and thread yarn if you want this flower smaller)
Yellow, white, green and blue worsted weight yarn
Yellow, white, green and blue worsted weight yarn
Abbreviations:
sc=single crochet
sl st=slip stitch
ch=chain
hdc=half double crochet
dc=double crochet
With yellow yarn ch 4, sl st to form ring
Rnd 1: ch 3 (counts as first dc), work 15 dc in ring, sl st = 16 dc
Rnd 2: ch 2 (counts as first sc and first ch1 space), *sc ch 1 in dc* repeat 15 times, sl st to first sc = 16 (sc ch1)
Rnd 3: ch 3 (counts as first sc and first ch2 space), *sc ch 2 in dc* repeat 15 times, sl st to first sc. Cut and weave in end = 16 (sc ch2)
Slip stitch in with White yarn for the petals
Rnd 4: *sc, chain 9, sc in first ch2 space, hdc in the next ch2 space*. Repeat * to* 7 times, sl st to first sc = 8 (sc, ch9 loop, sc, hdc)
Rnd 5: ch 4 (counts as first dc and first ch1 space), *dc between scs keeping yard behind ch9, ch 1, dc in hdc, ch 1*. Repeat * to* 7 times, sl st to first sc. Cut and weave in end = 16 (dc, ch1)
Slip stitch in with Blue yarn to a ch 1 space after the dc behind the ch9 loop for background
Rnd 6: ch 4 (counts as first dc, ch1), *dc in dc between loops, ch1, dc on ch 1 space, ch1, dc in dc behind loop, ch1* repeat 7 times, sl st to third ch = 16 (dc, ch1)
Rnd 7: ch 1 (counts as first sc), *sc in ch 1, sc in dc, sc in ch1, (sc, ch6, sc in dc), * repeat 4 times, sl st to first sc = 4 (5sc, ch6 loop, 1 sc)
Rnd 8: ch 3 (counts as first dc), dc in next 5 sc, *ch3 behind loop, dc in 6 sc*, repeat two times, ch 3 behind loop, sl st to first ch3 = 4 (6dc, ch3)
Rnd 9: ch 1 (counts as first sc), sc in next 5 dc, sc, hdc, dc, ch2, dc, hdc, sc in loop, *sc in 6 dc, sc, hdc, dc, ch2, dc, hdc, sc in loop*, repeat two times, sl st to first ch1 = 4 (7sc, hdc, dc, ch2, dc, hdc)
Rnd 10: ch 1 (counts as first sc), sc in next 8 stitches, sc, hdc, dc, ch2, dc, hdc, sc in loop, *sc in 12 st, sc, hdc, dc, ch2, dc, hdc, sc in loop*, repeat two times, sl st to first ch1. Cut and weave in end = 4 (14sc, hdc, dc, ch2, dc, hdc).
Slip stitch to chain 6 loop in Rnd 7 with Green yarn for the leaves
Rnd 11: 4 dc, ch 1, sl st to sc of background, 4 dc. Cut and weave in end. Repeat in each chain 6 of rnd 7 = 4 leaves
Slip stitch to chain 9 loop in Rnd 4 with White yarn for the petals
Rnd 11: 4 dc, sl st to sc of background to side of leaf, 4 dc, sl st to sc of background on other side of leaf, 4 dc. Repeat 7 times. Cut and weave in end = 8 petals
