Spring Has Sprung!

It’s April, the birds are singing outside my window, the bulbs are coming up in my gardens and the grass is starting to get green.  So, it’s time to change the decor in my bedroom – a new Daisy Bed runner really added some springtime color.


IMG_2115

To make this bedrunner, I used the leftover blue fabric from the backing of my butterfly quilt as the main background.  To supplement the blue, I took out some of my custom dyed fabric samples, generally ones that were trials on different dyeing techniques. For added color, I decided to try out some fabric paint crayons.

A few years ago, I took a class on Shiva Paintsticks and Rubbing Plates.  I enjoyed the class and purchased some supplies.  However, time being in short supply, I really hadn’t used them since completing the class.

This project, I thought would be a good use of the paintsticks to embellish the fabrics that I had in my collection. After a day of painting, I set the fabrics aside for a week to allow the oils in the dye crayons to dry.  The dye pigment was then heat set by ironing the fabric between pieces of brown paper (absorbs the excess oils very nicely).  The resulting fabrics were really interesting.

Triangles were cut out of the fabrics and the border was then made by alternating triangles of blue and color.

IMG_1754

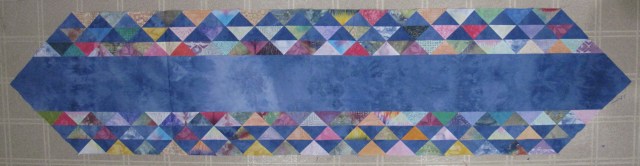
To enhance the bedrunner, daisies and leaves were appliqued onto the center panel. The runner was quilted and the binding added.


Bounce – a playful quilt depicting the view of a child’s ballpit

As promised, I took some pictures of my quilt.  This is a twin sized quilt.  The scalloped edge along the stitched circles marks the edge of the mattress.  So, when on a bed, the view of the ball pit and the bounce line will be very visible.  The border spaced balls will fall on the overhanging quilt border.

IMG_2056
Quilt Front

Because the background is dark, it is hard to get a good photo that shows the stitching. However, I used a light tan for the backing. Flip over the quilt, and the stitching is very visible.  After finishing the long-arm quilting, I felt that the stitched balls were getting lost in the background and hard to see.  So I added a decorative stitch edging to these stitched circles. I think it really helps make the circles stand out more both on the front, but especially on the back, of the quilt.

IMG_2086
Quilt Back
IMG_2092
Close-up of Stitching

This quilt was a lot of fun to make.  Certainly the most stitch edged applique that I have ever done.  I have so many other ideas for quilts to make.  Time to get sewing again!


National Quilting Day

Today is National Quilting Day.  And, how did I spend my day – quilting, of course!

I was actually able to finish a quilt that I started a few weeks ago. The lighting at the time I finished binding the quilt was not adequate to take good photos.  So, I will post the finished photos tomorrow after I am able to take some nicer photos.

However, I did take photos along the way as I worked on this quilt.

IMG_2029
Applique completed
Upholstery
Upholstery Fabric

I have named the quilt “Bounce”. The idea was inspired by the vinyl upholstery fabric on the chairs in the staff lounge at Children’s Hospital Surgery Center.

A little over a year ago, we were also considering this fabric for our office remodel.  When I brought a sample of the vinyl to show our staff, one person commented that it looked like a quilt pattern.

Idea
Design


Ultimately we selected a different fabric. But, the idea of making a quilt stuck in my mind. A design was created that took the circles of the fabric and replicated them in an applique pattern that looked like balls bouncing in a ball pit.

This winter, I was able to start working on the quilt. This has been a really fun quilt to make!

Using scraps from previous quilts, I first cut out 124 circles measuring 3.25″.

IMG_1929

These circles were then appliqued onto white cotton fabric using my collection of Gutermann thread (50wt).

IMG_1931

From the appliqued fabric, I then drew and cut circles that overlapped the appliqued circles so that the resulting pieces looked like balls. This double applique approach really made this quilt easier to applique than it appears to be.  Basically I was only having to stitch circles each time, rather than partial circles.

IMG_1930

For the background of the quilt, I kept debating between tan and sky blue.  Then, one day, while looking for backing for another quilt, I found some fabric that looked like denim and thought that would be a nice background.

Final pictures tomorrow….


Ocean Swells Crochet Scarf

img_2065

Not wanting to be idle, I like to carry projects with me that I can work on when I have to wait.  My current project was completed rather quickly, in less than two weeks.  Having to wait four hours to see a patient for a consultation at Children’s Hospital contributed greatly to the rapidity of this project.

I recently came across a pattern that reminded me of the waves of the ocean.  When I looked up the name of the pattern, I found that the name, Ocean Swells, fit my thoughts very well.

I decided that I would make a scarf. So, I looked through my supply of yarn and found some that I thought would work well.

Pattern:

  • Row 1: ch 30, sc into second st from hook, sc in next 4 sts, *hdc,  dc, tc, dc, hdc. 9sc*,  rep pattern. End row with 5 sc.
  • Row 2: ch1, 3 sc, sk 2, dc, ch1, dc and ch1 for next four sts, sk 2, 5 sc, ch1, sk 2, *dc, ch1 *five times, sk2, finish row with 3 sc.
  • Row 3: sk 3 dc, work 2dc into first ch1 sp, repeat in next ch1 sp, work 3 dc in next ch1 sp, dc into top of next dc from previous row, 3dc into next ch1 sp, 2dc in the next two ch1 spaces, sk 2 sc and sc into next. Sk next 2 dc and repeat pattern, finishing off with a sc into last st.
  • Row 4: ch1, then sc across into each st.
  • Row 5: ch4 and dc into same st, hdc, sk 1 st, 9sc, sk 1st, hdc, dc, tr, dc, hdc, sk1, 9sc,sk1, hdc, dc and end row with a tr.
  • Row 6: ch4, dc into next st, ch1, dc, ch1, sk 2 sts, 5sc, ch1, sk 2 sts, dc, ch1 5 times, sk2, 5sc, ch1, sk2, dc, ch1, dc, ch1 and dc into ch4 of previous row.
  • Row 7: ch3, 2dc in each of the three ch1 sp, sk 2sc, sc, sk 2sc, 2dc in next 2 ch1 sps, 3dc in third ch1 sp, 1dc in top of dc from previous row, 3dc in ch1 sp, 2dc in next 2 ch1 sps, sk 2sc, sc to anchor, sk 2 st, 2dc in next 3 ch1 sps, 1dc into top of turning ch from last row.
  • Row 8: ch1, sc across row.
  • Row 9: ch1, 4sc, sk 1 st, *hdc, dc, tr, dc, hdc, sk 1 st, 9sc, sk 1, repeat * to end, sc last 4 sts.
  • Row 10: ch1, 2sc, sk 2 sts, *ch1, (1dc, ch1) 5 times, sk 2 sts, 5sc,ch1, sk 2, 5sc, repeat from * to end of roimg_0208w, ending with 2sc
  • Repeat rows 3-10 until project reaches desired length.


There is a YouTube tutorial available at:  https://www.youtube.com/watch?v=rpNhPK1j4-g


Window on My World – quilting and hand embroidery. I’m done!

img_2039

After hours of quilting and hand embroidery, I have finished my lanscape quilt. I am very pleased with the result. Hopefully when I look at it, I won’t find something that I want to change.

Each season has lots to look at – animals, plants, etc.  It really does look like my backyard.

img_2041
Winter / Midnight
img_2042
Spring / Sunrise


img_2043
Summer / Midday


img_2044
Autumn / Sunset


Some of the details:

img_2045
Our first dog, a German Shorthair Pointer named Striker, and some hand embroidered flowers.
img_2046
One of our first cats, Comet, who liked to climb trees, and some more flowers.
img_2047
Our yorkie, Duke, barking an our cat, Onyx.  Onyx is always trying to get up and away from him.
img_2048
Our oldest cat, Squigglez, who will be thirteen years old this summer, does enjoy wondering in the yard in the summertime.
img_2049
Having a heavily wooded yard and lots of plants, we have lots of wildlife that visit.


Window on My World – applique.

It has been a while since I have posted.  But, after the holidays were over, I returned to working on the landscape quilt for my wall.

After piecing the backgrounds, the next step was to consider what to applique onto each seasonal panel.  Since this wall quilt is meant to be a memory of my backyard, I wanted to include things in my yard. Some shapes were cut by hand – trees mainly.  The rest of the shapes were cut using my Cameo.
img_1825

Winter / Midnight

A few evergreen trees
An apple tree
Animals – deer, rabbit, cardinal and bird


img_1826

Spring / Sunrise

Apple and lilac trees
Trellis with bench swing
Another Rabbit
Family Pets – two of our cats – Squigglez and Onyx

img_1827


Summer / Midday

A few more trees
Trellis, sun
Duke, our Yorkie, barking at Onyx
Comet, one of our former cats, climbing a tree


Autumn / Sunsetimg_1830

A few more trees in fall colors
Squirrel
Striker, our former German Shorthair Pointer


After taking the photos, I decided that I needed to add something in the foreground of the two center panels.  Since we actually have a fire pit in our backyard, I added one, split between the  two panels.  An Adirondack chair on either side of the fire pit completed the applique designs.

Next up, quilting and hand embroidery, should be finished soon.

The Man and The Birds

christmas-birds

Paul Harvey was a radio broadcaster that I grew up listening to each and every week.  I had not heard any recordings of his stories for several years.  Then, yesterday, before our Christmas Eve family dinner, my husband played the audio of “The Man and the Birds”.  Such fond memories of my childhood and such tremendous meaning in that story.

Today, Pastor Wes at our church (Berean Baptist) also read this story.  Once again I was reminded of the meaning of the story.  There are many in our society who have not fully grasped the meaning of Christmas and the significance of God’s love for us.  So, maybe this story will touch them and help them to gain the perspective of the wonderful gift we have been given.

The Man and the Birds by Paul Harvey.

Holiday Candy

Last year I discovered a couple recipes for making candy the easy way – in the microwave. So, this year, I decided I would try to find a few more recipes.  And, since fudge is a traditional holiday treat, I thought I would try a few microwave fudge recipes. I found two different types of recipes – one using sweetened condensed milk and the other using evaporated milk and marshmallow fluff.

Peanut Butter Fudge
3 cups Peanut Butter Chipsimg_1999
1 can sweetened condensed milk
1/2 cup Peanut Butter
1/2 cup finely chopped, salted peanuts
1  cup dark chocolate chips
1/2 cup heavy cream

Line a 9″ pan with foil and spray with nonstick cooking spray.  In an 8 cup microwave bowl, microwave chips uncovered on medium in 1 minute increments for 3 to 4 minutes until melted and smooth, stirring well after each minute.  Stir in milk, peanut butter, and peanuts until blended.  Press mixture evenly into pan.  Refrigerate 30 minutes.

In a small bowl, microwave chocolate chips and cream on high for 60-90 seconds, stir until smooth.  Spread evenly over fudge.  Refrigerate for one hour. Cut into 8 rows of 8 pieces. Store in an airtight container.

White Chocolate Fudgeimg_2004
3 cup sugar
1 (6 ounce) can Evaporated milk
1/2 cup butter
12 ounces Premium White Chocolate Chips
1 (7 1/2 ounce) jar Marshmallow Fluff
1 tsp vanilla
1  cup toasted chopped almonds
1/2 cup dried cranberries

Line a 9″ pan with foil and spray with nonstick cooking spray.

In an 8 cup microwave bowl, combine sugar, milk and butter and microwave uncovered on high for 3  minutes.  Stir and microwave for 7 additional minutes, stirring every minute.  Add chips and marshmallow fluff and stir until melted and creamy.  Add remaining ingredients and mix until blended.

Press mixture evenly into pan.  Refrigerate for one hour. Cut into 8 rows of 8 pieces. Store in an airtight container.

Both recipes turned out well.  Although traditional fudge is much fluffier.  So, I will probably return to those in the future.

I did make the Microwave Peanut Brittle and English Toffee (recipes found here:Microwave Candy – English Toffee and Peanut Brittle) that I had tried last year.  Those were very tasty again!

Holiday Baking – Thumbprint Cookies

Day Two of holiday baking included several different of Thumbprint Cookies

Salted img_1981Caramel Thumbprint Cookies
Cookie:
1 cup butter
3/4 cup granular sugar
1 teaspoon vanilla
3 eggs (yolks only)
2  1/4 cup flour
Filling:
1/2 cup brown sugar
1/3 cup butter
3 Tbs heavy cream

Combine 1 cup butter, sugars, egg yolks and vanilla and beat until creamy.  Add flour and beat at low speed until well mixed.  Cover and refrigerate for one hour.

Preheat oven to 375 degrees F. Shape dough into 1″ balls.  Place on parchment paper lined cookie sheets, 2″ apart.  Make an indent in the center of each cookie with the end of a wooden spoon handle.  Bake for 7-10 minutes until edges begin to brown.

Combing brown sugar with 1/3 cup butter in a small saucepan.  Cook over medium heat, stirring constantly until the mixture begins to boil.  Continue cooking and stirring for one more minute.  Stir in whipping cream.  Allow to cool for about 15 minutes.  Spoon 1/2 teaspoon caramel mixture into the center of each cooled cookie. Sprinkle with coarse sea salt. Then transfer to wire rack to cool completely.

Chocolate Caramel Thumbprint Cookiess img_1972

Trial #1:  Follow the recipe above.  When the cookies are removed from the oven, top with a chocolate star candy and cover with caramel.


img_1986


Trial #2:  Follow the recipe above.  When the cookies are removed from the oven, top with a chocolate star candy and drizzle with caramel.

Trial #2 looked nicer and tasted better!


Red Velvet Thumbprint Cookiesimg_1982
I made these last year and really liked them. So, they were included in my baking this year as well.  For the recipe, see the December 15, 2015 posting.