In a Minnesota winter, a hat is a necessary piece of clothing. But that doesn’t mean that it needs to be dull and boring. A hat can be a fashion accessory that helps define your personality. Adding a scarf also helps for warmth and is another way to accessorize your outerwear.
Over the past couple months, I have been busy making several hat and scarf sets. Some of these are listed for sale on this site. But, most have been donated to Minnesota Hats & Mittens organization. I use my own ideas for most of these projects. If you would like to duplicate them, I have included my patterns below each item.
Gradation Hat and Scarf Sets

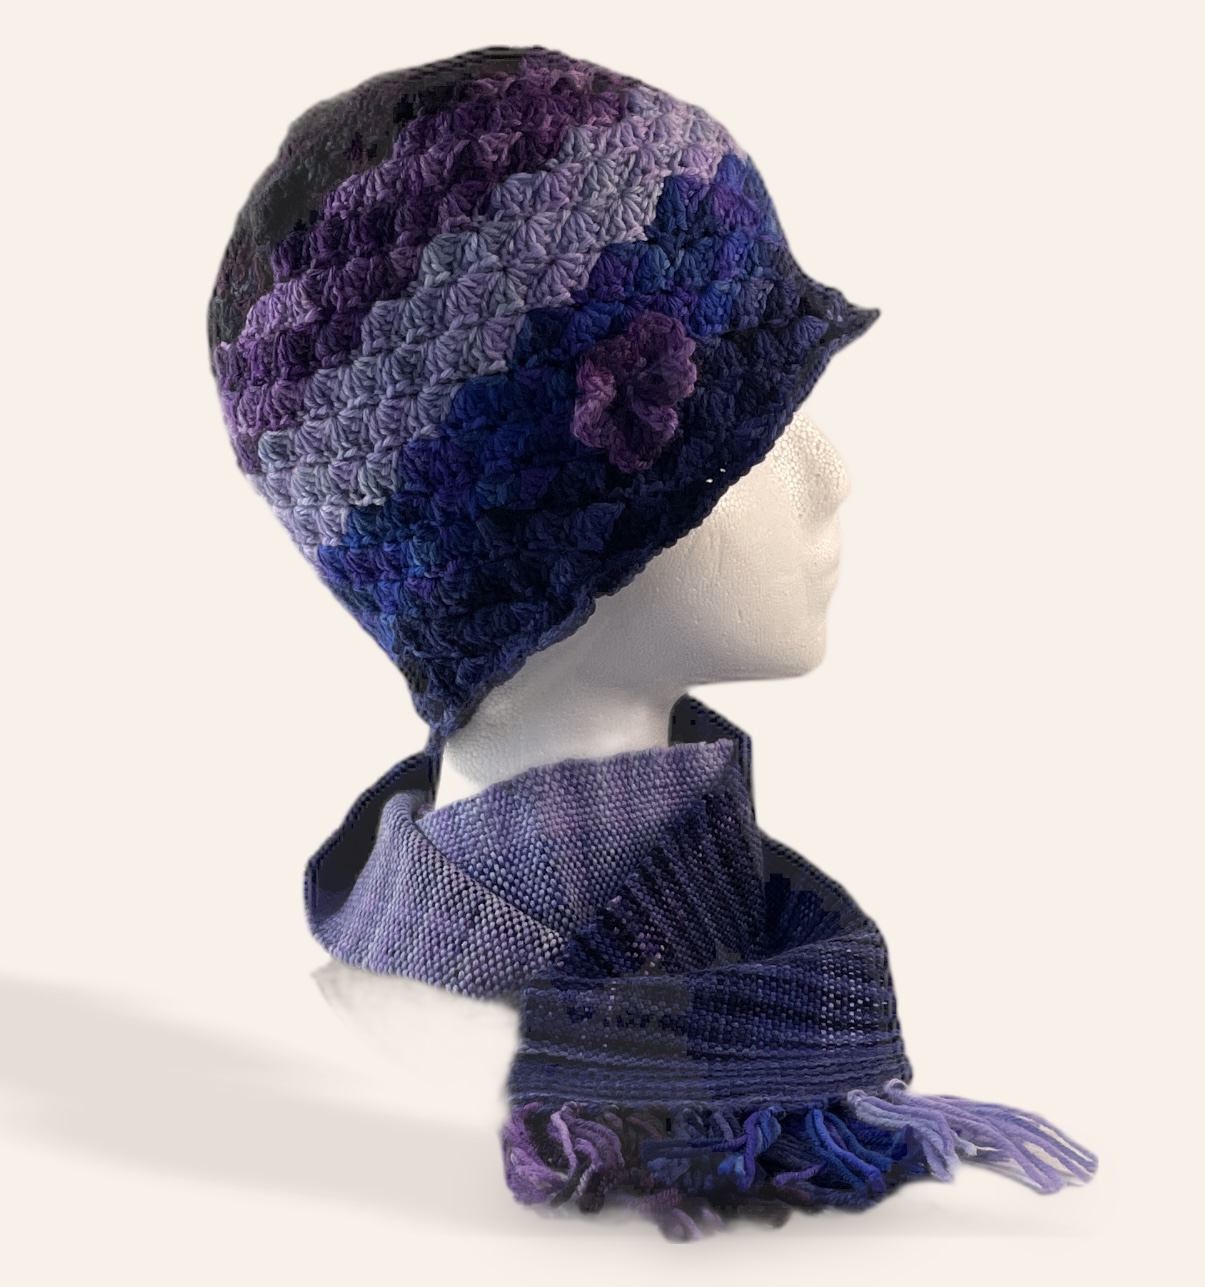
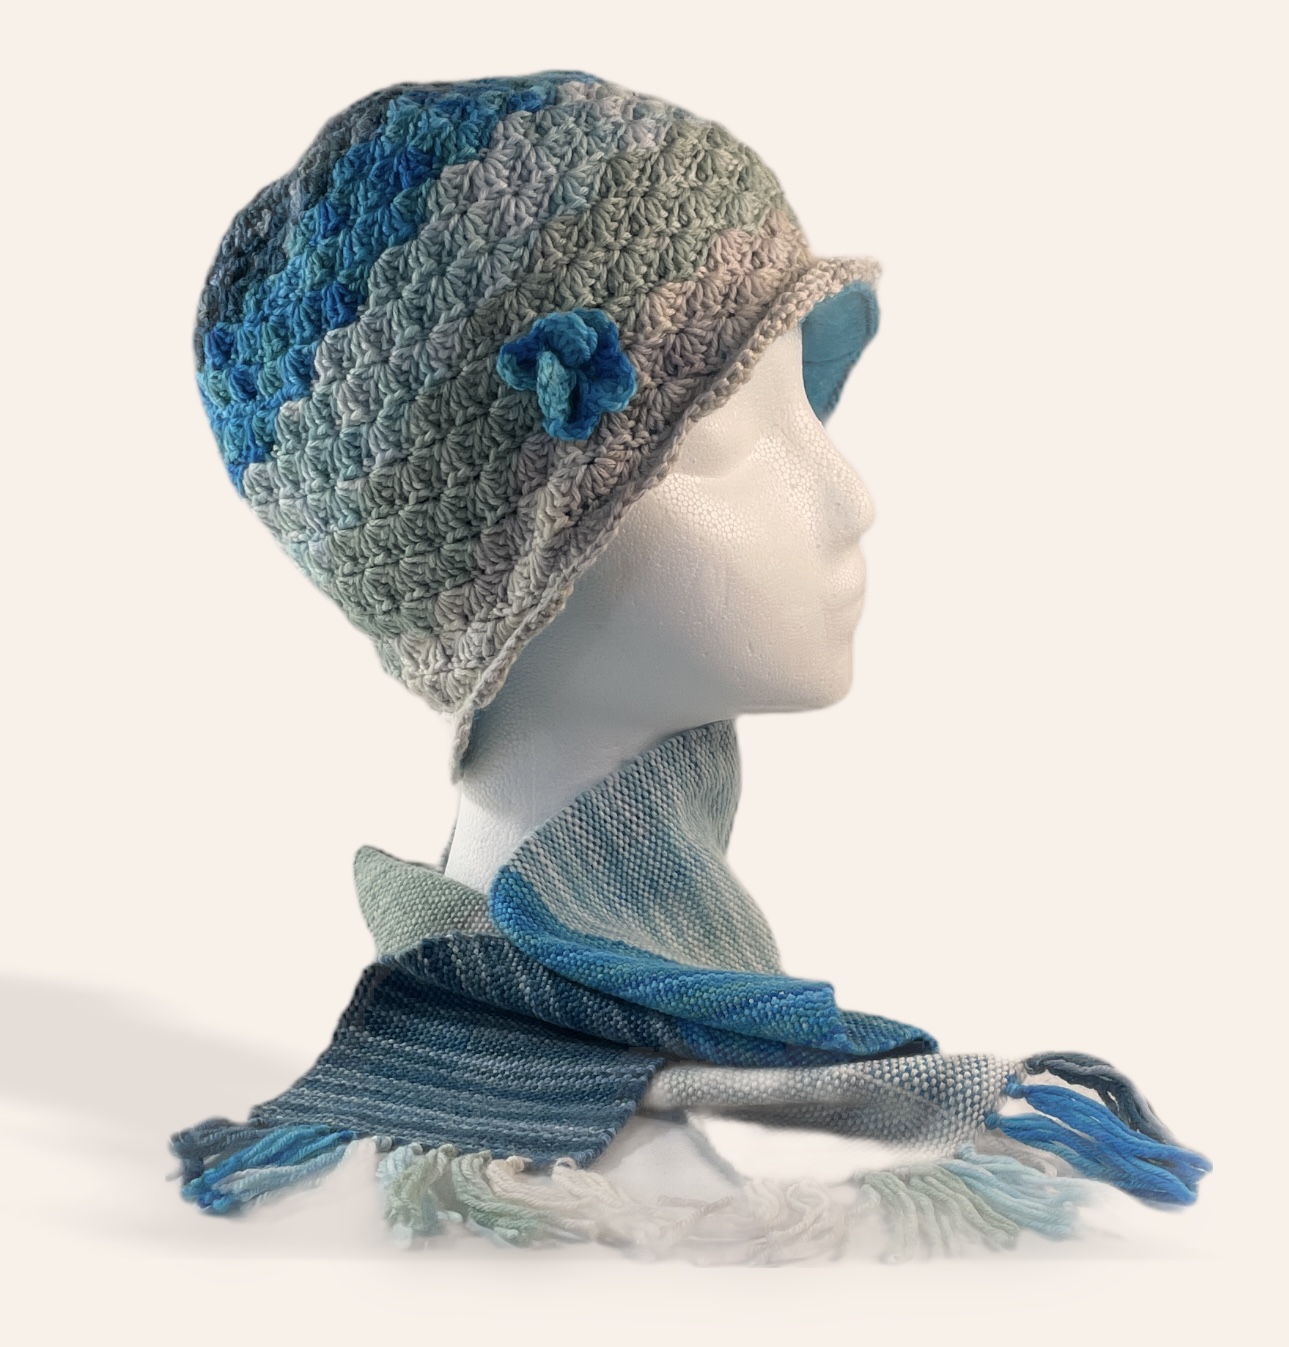
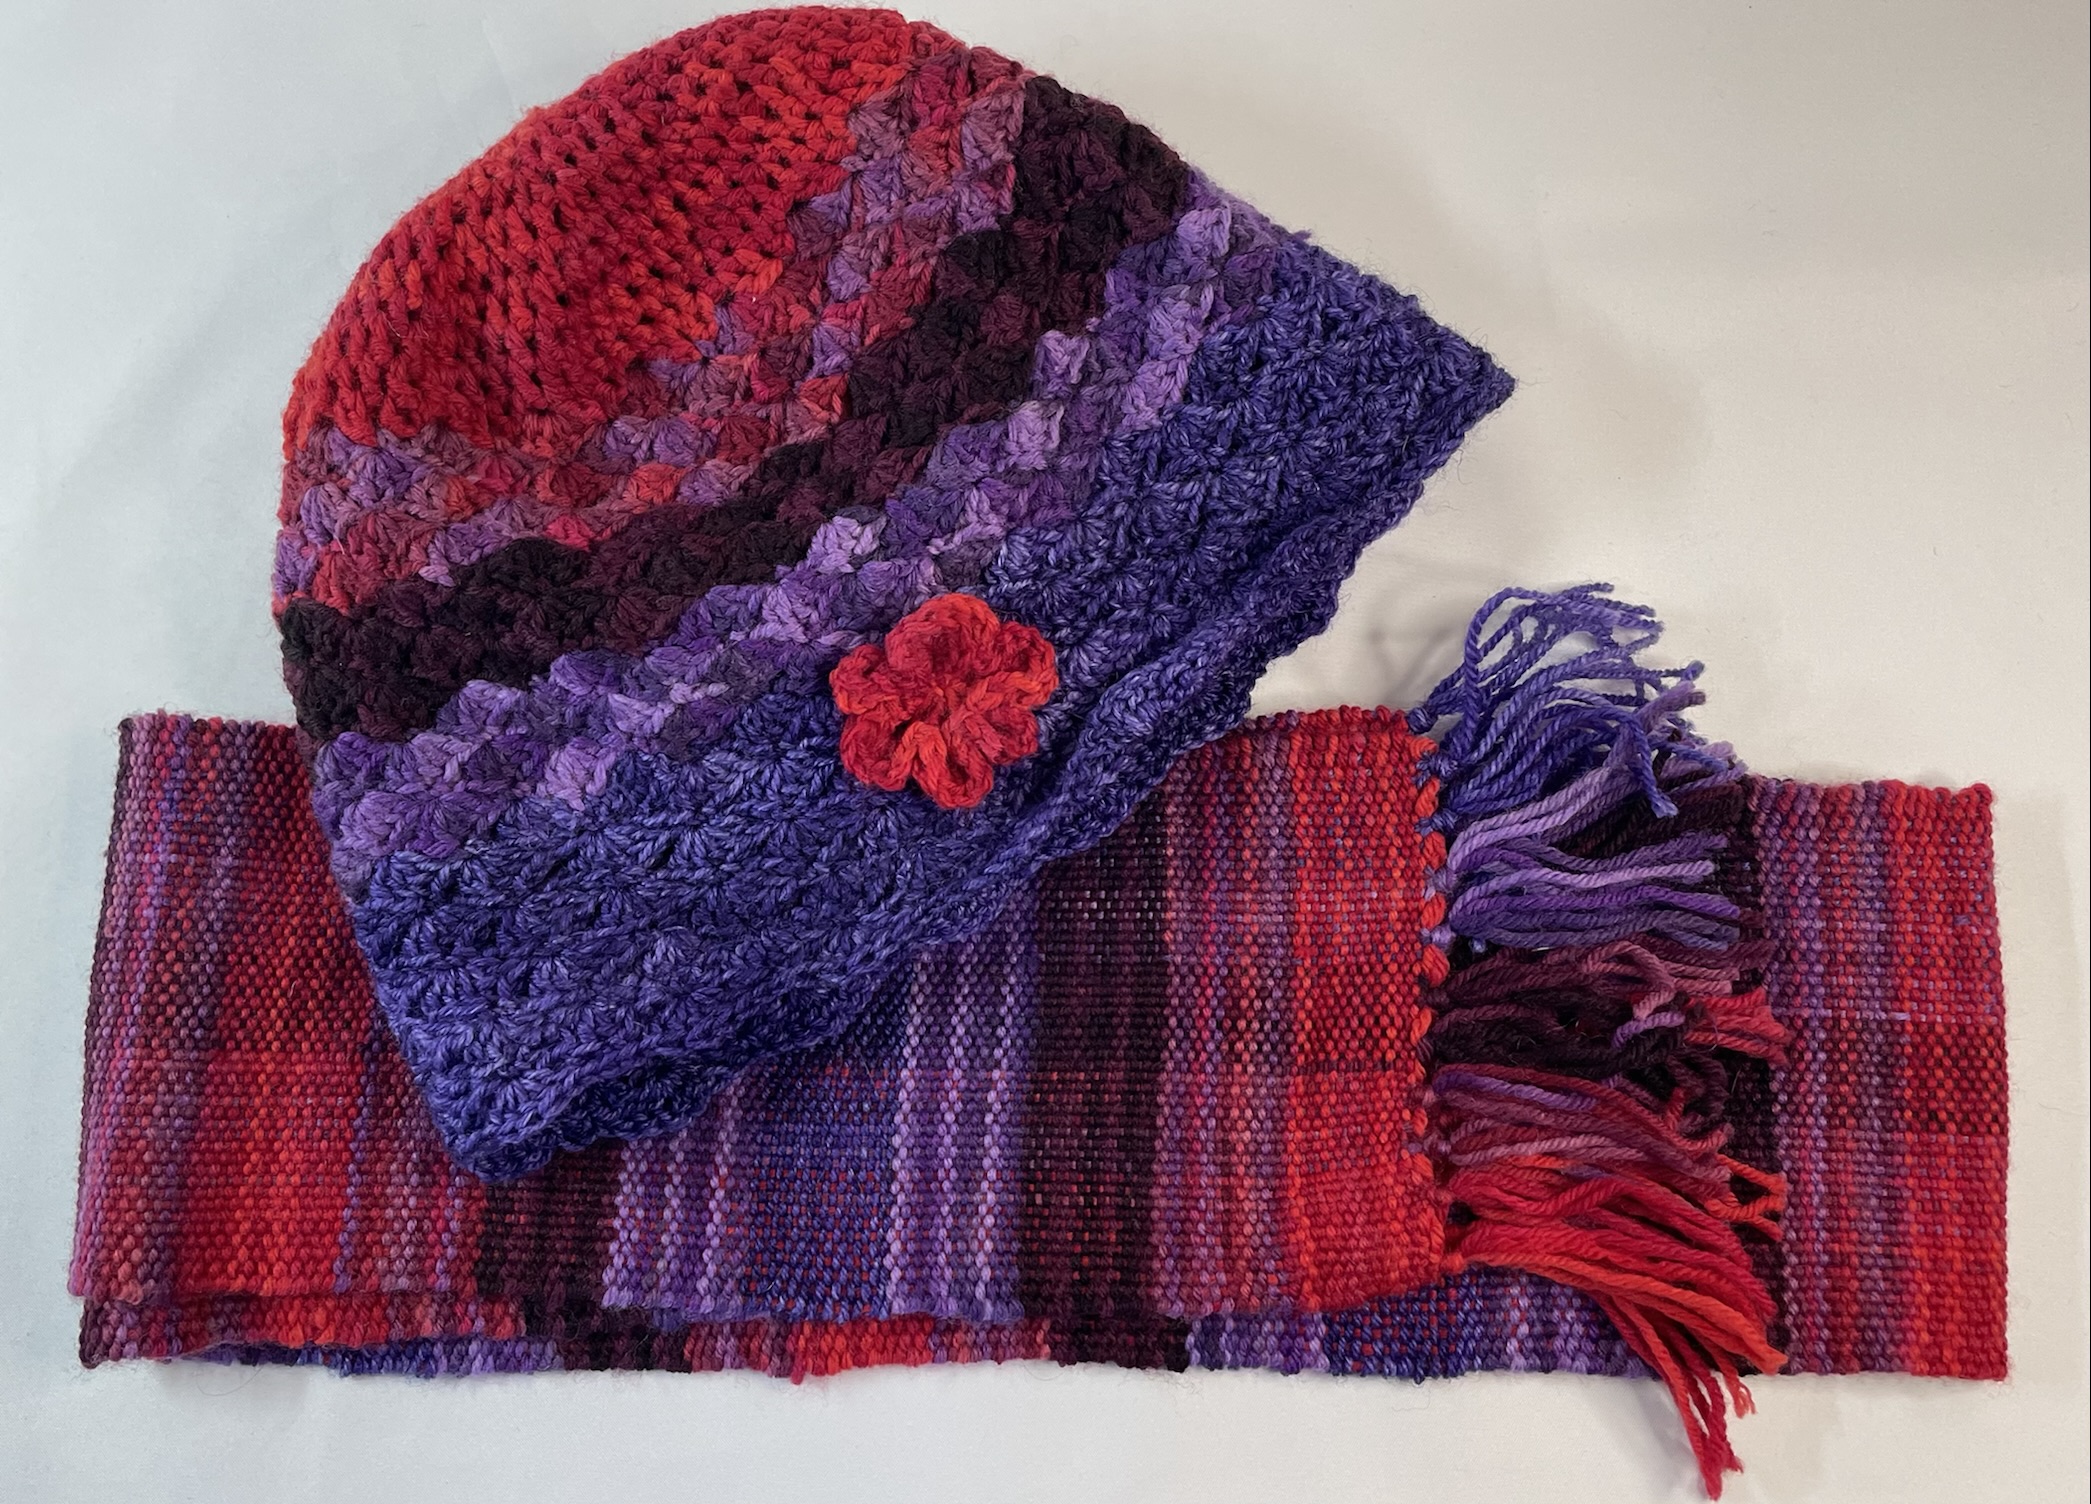
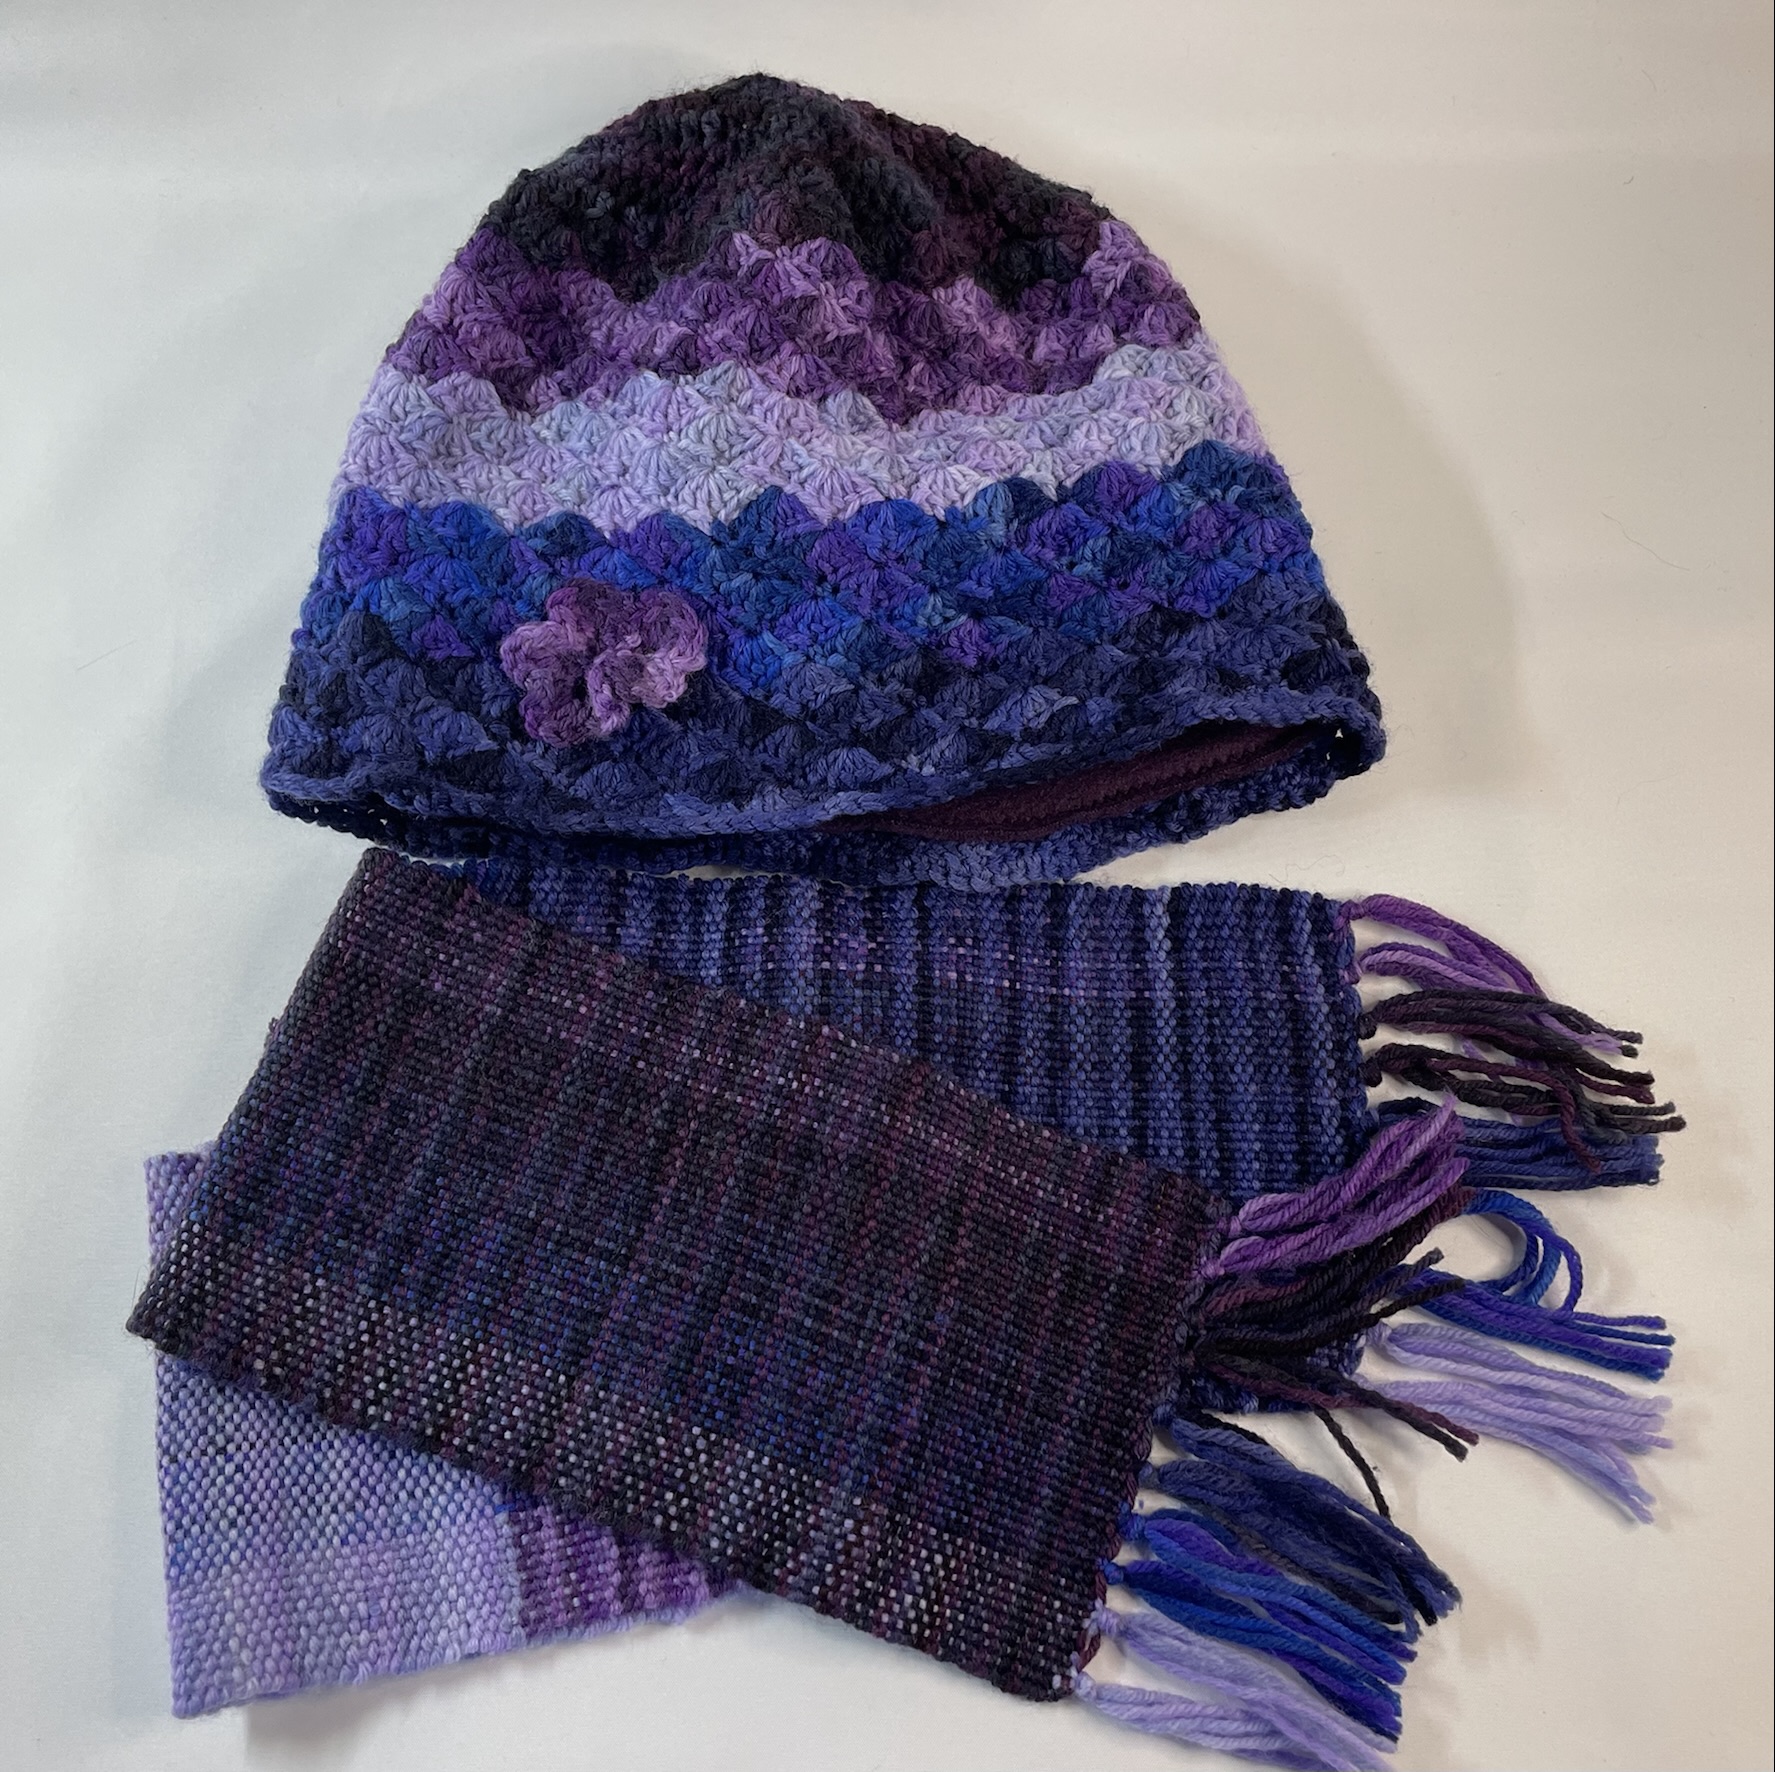

Hat Pattern: Fingering weight yarn, E crochet hook. R1 – MR, ch2, HDC x9 in ring, join with SS (10 st). R2 – work 2 HDC in each stitch around (20). R3 – DC in first stitch, 2 HDC in next stitch, repeat around (30). R4 – DC in first 2 stitches, 2 HDC in next stitch, repeat around (40). R5 – DC in first 3 stitches, 2 HDC in next stitch, repeat around (50). R6 – DC in first 4 stitches, 2 HDC in next stitch, repeat around (60). R7 – DC in first 5 stitches, 2 HDC in next stitch, repeat around (70). R8 – DC in first 6 stitches, 2 HDC in next stitch, repeat around (80). R9 – DC in first 7 stitches, 2 HDC in next stitch, repeat around (90). R10 – DC in first 8 stitches, 2 HDC in next stitch, repeat around (100). R11 – DC in first 9 stitches, 2 HDC in next stitch, repeat around (110). R12 – DC in first 10 stitches, 2 HDC in next stitch, repeat around (120). R13 – c1, *SC in first stitch, skip 2 stitches, work 5 shell in next stitch, skip 2 stitches*, repeat * around, SS to first stitch (20 shells). R14 – SS over 3 stitches to top of shell, *SC, skip 2 DC (of shell), work 5 shell in next SC, skip 2 DC (of shell)*, repeat * around, SS to first stitch (20 shells). R15-32 – Repeat rows 13 and 14 nine more times. R33 – SS over 3 stitches to top of shell, *SC, skip 2 DC (of shell), work 7 shell in next SC, skip 2 DC (of shell)*, repeat * around, SS to first stitch (20 shells). Finish off.
Scarf Pattern: 10 dent reed. Warp length – 72″. Warp ends – 50. Structure – even weave. Finished size – 4.25″ x 42″.
Apricot Hygge Hat and Scarf Set


Hat Pattern: Fingering weight yarn, Size 8 circular knitting needle (20″ length). Using one strand Hygge yarn and one strand white cotton yarn together, Cast on 80 stitches. Join to work in the round, being careful not to twist the first row. Work in K1 P1 rib stitch for ten rows. Cut Hygge yarn and join with apricot cotton yarn. Knit around until hat measures 6″. Decrease row 1: K8, K2tog, around. Decrease row 2: K7, K2tog, around. Decrease row 3: K6, K2tog, around. Decrease row 4: K5, K2tog, around. Decrease row 5: K4, K2tog, around. Decrease row 6: K3, K2tog, around. Decrease row 7: K2, K2tog, around. Decrease row 8: K1, K2tog, around. Decrease row 9: K2tog, around. Finish off and draw end through last stitches, tighten to close ring. Bury threads.
Scarf Pattern: 7.5 dent reed. Warp yarn – white cotton fingering weight. Warp length – 72″. Warp ends – 40. Weft yarn – Hygge apricot yarn. Structure – even weave. Finished size – 4.5″ x 41″.
Vibrant Pink Hat and Scarf Set

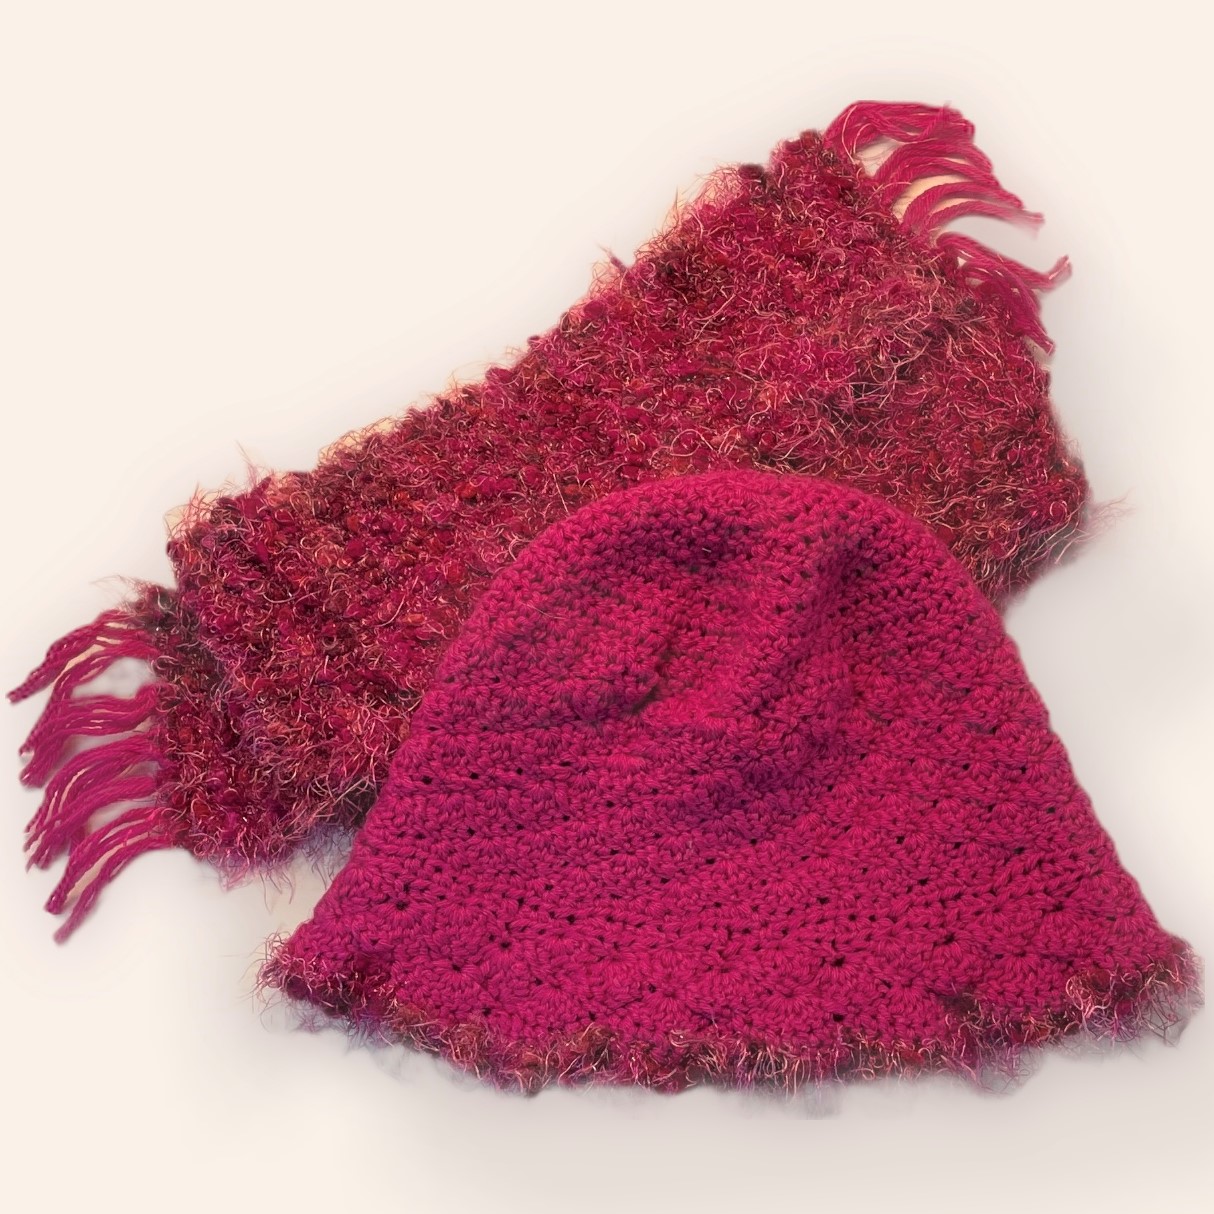
Hat Pattern: Worsted weight yarn, G crochet hook. R1 – MR, ch2, HDC x7 in ring, join with SS (8 st). R2 – work 2 HDC in each stitch around (16). R3 – DC in first stitch, 2 HDC in next stitch, repeat around (24). R4 – DC in first 2 stitches, 2 HDC in next stitch, repeat around (32). R5 – DC in first 3 stitches, 2 HDC in next stitch, repeat around (40). R6 – DC in first 4 stitches, 2 HDC in next stitch, repeat around (48). R7 – DC in first 5 stitches, 2 HDC in next stitch, repeat around (56). R8 – DC in first 6 stitches, 2 HDC in next stitch, repeat around (64). R9 – DC in first 7 stitches, 2 HDC in next stitch, repeat around (72). R10 – DC in first 8 stitches, 2 HDC in next stitch, repeat around (80). R11 – DC in first 9 stitches, 2 HDC in next stitch, repeat around (88). R12 – DC in first 10 stitches, 2 HDC in next stitch, repeat around (96). R13 – c1, *SC in first stitch, skip 2 stitches, work 5 shell in next stitch, skip 2 stitches*, repeat * around, SS to first stitch (16 shells). R14 – SS over 3 stitches to top of shell, *SC, skip 2 DC (of shell), work 5 shell in next SC, skip 2 DC (of shell)*, repeat * around, SS to first stitch (16 shells). R15-22 – Repeat rows 13 and 14 four more times. R23 – SC in each stitch (96 SC). R24 – HDC in each stitch. R25 – *SC, skip 2 stitches, work 7 shell in next HDC, skip 2 DC*, repeat * around, SS to first stitch (16 shells). R26 – SS over 4 stitches to top of shell, *SC, skip 3 DC (of shell), work 7 shell in next SC, skip 3 DC (of shell)*, repeat * around, SS to first stitch (16 shells). R27 – Repeat row 26 one time. Finish off. R28 – attach eyelash yarn, SC in each stitch. Finish off.
Scarf Pattern: 7.5 dent reed. Warp yarn – pink worsted weight. Warp length – 72″. Warp ends – 40. Weft yarn – pink eyelash yarn. Structure – even weave. Finished size – 4″ x 45″.
Box Pleat Hats


Hat Pattern: Worsted weight yarn, Size 6 and 8 circular knitting needles (20″ length). Cast on 100 stitches. Join to work in the round, being careful not to twist the first row. Work in K1 P1 rib stitch for 2″. Change to size 8 needles and knit around until hat measures 9″. Transfer half of stitches to a separate needle. Seam by knitting one stitch from each needle together with cast off stitch. Tack down the tips of the hat to create the box pleat. Bury threads.
Varied Stitch Knit Hat and Scarf Set


Hat Pattern: Worsted weight yarn, Size 8 circular knitting needles (20″ length). Cast on 80 stitches. Join to work in the round, being careful not to twist the first row. Work in K2 P2 rib stitch for 16 rows. *Knit 2 rows. Purl 8 rows. Knit 2 rows. K2 P2 for 8 rows.* Repeat * * once. Decrease row 1: K8, K2tog, around. Decrease row 2: K7, K2tog, around. Decrease row 3: K6, K2tog, around. Decrease row 4: K5, K2tog, around. Decrease row 5: K4, K2tog, around. Decrease row 6: K3, K2tog, around. Decrease row 7: K2, K2tog, around. Decrease row 8: K1, K2tog, around. Decrease row 9: K2tog, around. Finish off and draw end through last stitches, tighten to close ring. Bury threads.
Additional Crochet Hats


Additional Knit Hats


Crochet Baby Hat and Linen Stitch Knit Scarf Set


And even an Octopus Hat (pattern purchased on Etsy)

Happy Crafting.