Fused Glass Fall Decor’

Yes, its been a while since I posted. I’ve been busy making things, but always find something else to do besides writing about my projects. And, since the person I started this blog for, my mother, is no longer able to read the blog, I have less incentive to post things.

For those that follow my blog, I apologize. Hopefully, I will get better at posting. But, I’m not making any promises.

This morning as I walked past my dining room, I felt a twinge of guilt for not posting about the fall glass art that I made over a year ago. If you recall, last winter I posted about some snow themed pieces I made for my dining room table. And, on May Day, I posted about some spring flower pieces. So, here is the update about the fall decor’ that I have made.
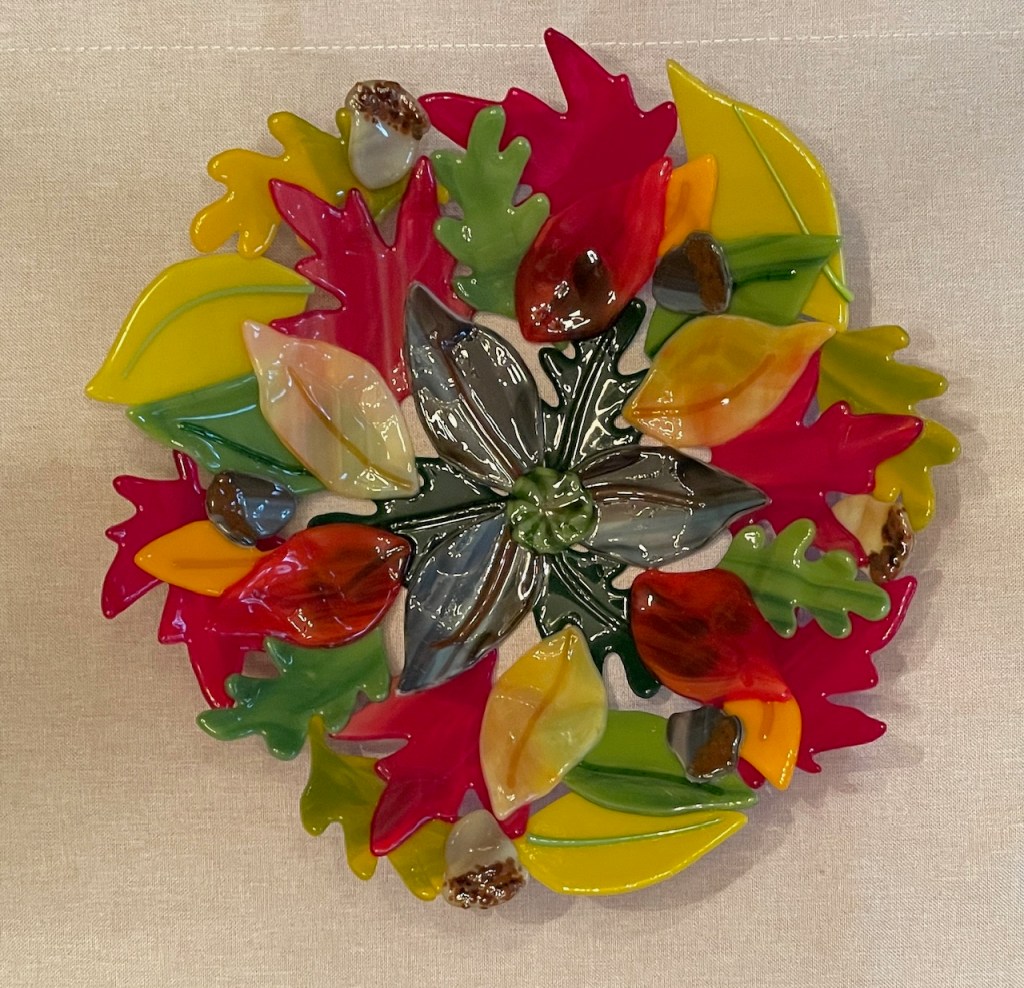
Leaf Bowl:

I started out by cutting and contour fusing several shapes of leaves in a variety of colors. I also made a few acorns. Please disregard the sweater and jewelry sets. At the time, I had space on the kiln shelf and so I added a few other items to this run of the kiln.

The leaves were then positioned to form a plate and tack fused together. When I placed the project in my slumping mold, I realized that the size was going to be smaller than I wanted.

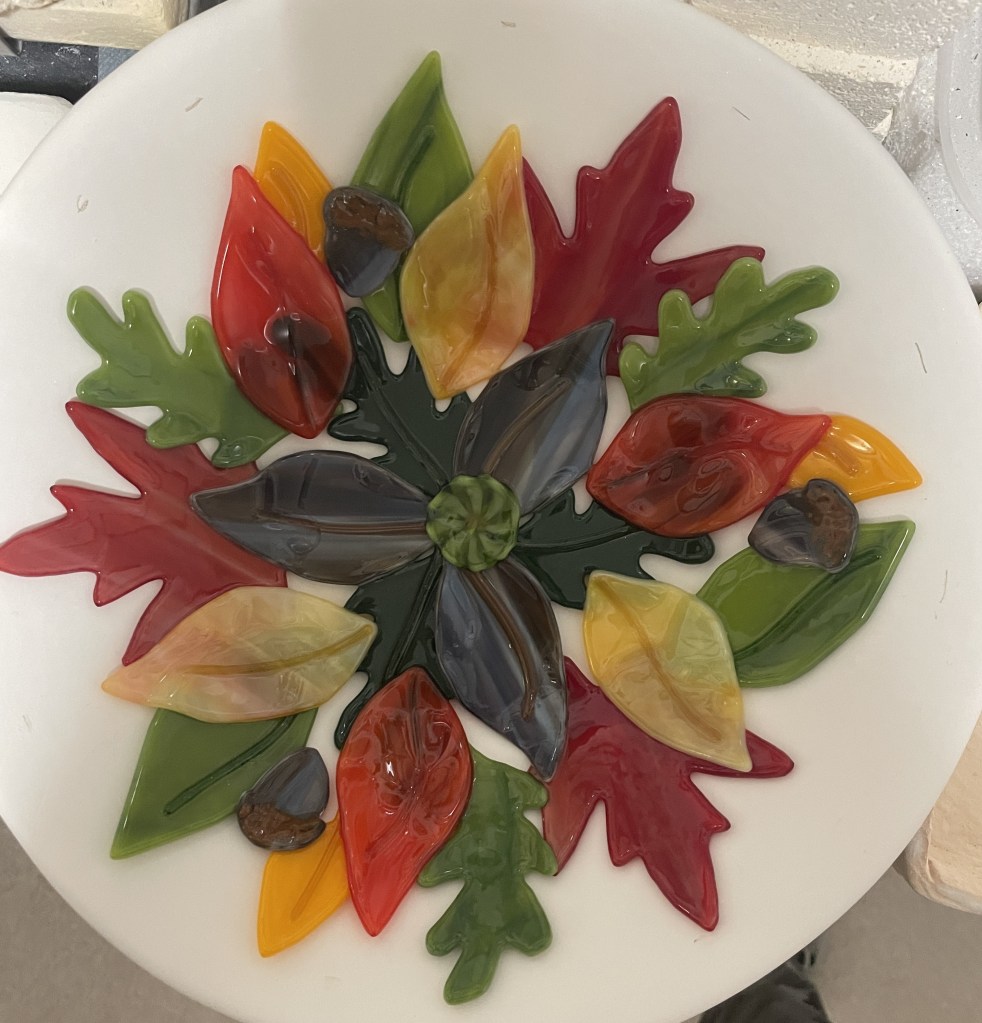
So, I contour fused a few more leaves and tack fused them together.

And then slumped into the mold.

Leaf Plates and Wood Turned Apples:

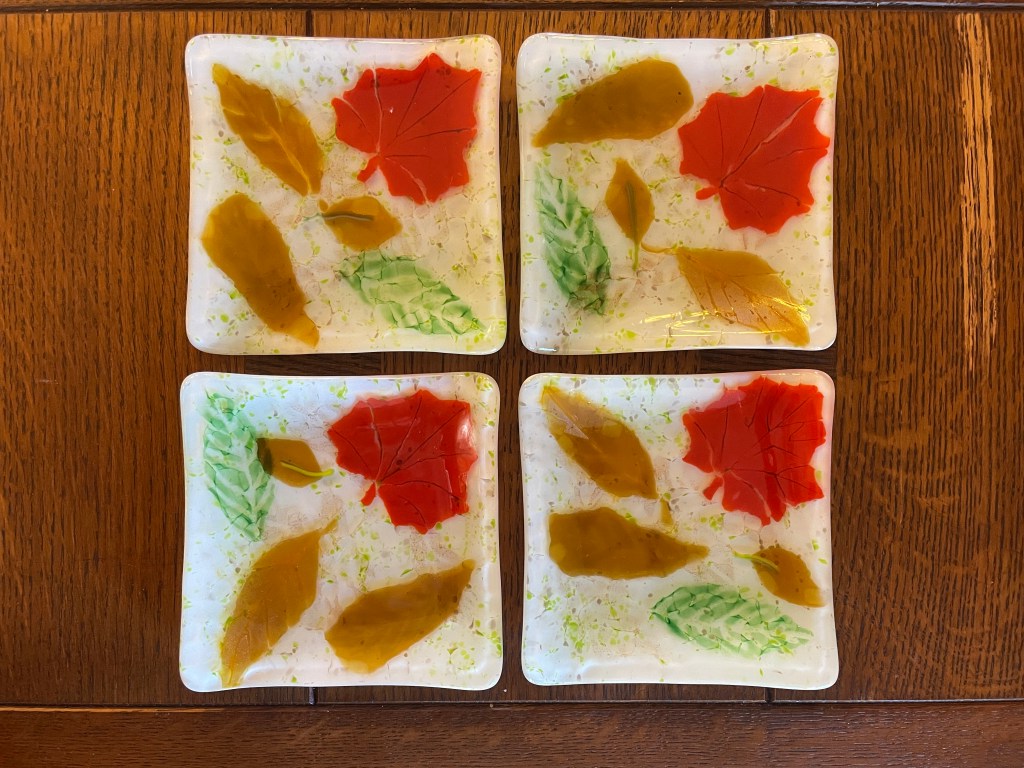
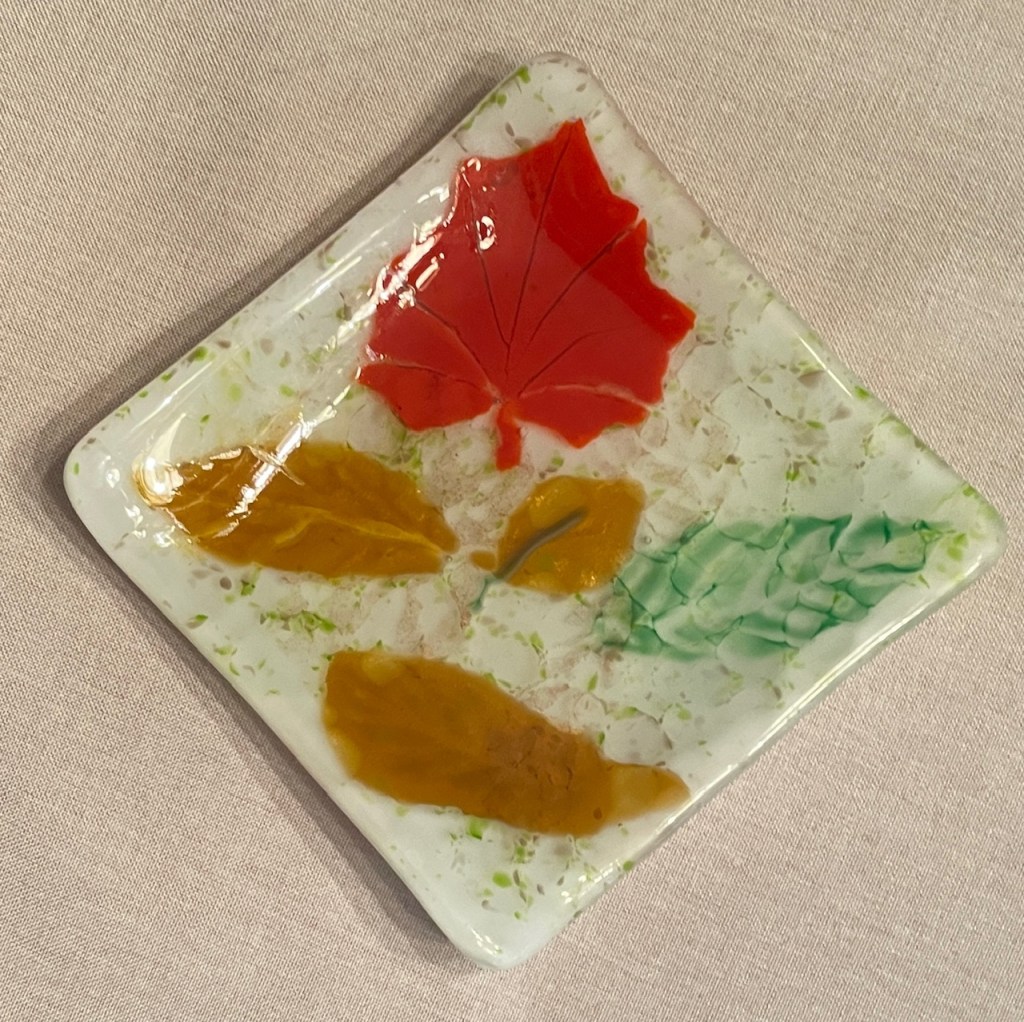
For additional decorations on the table, I pulled out one of the fall dessert plates I made a few years ago. Unfortunately, at the time, I did not take any pictures of how I made the set of four plates. In summary, leaves were cut out of different colors of glass or frit stenciled onto the base. Clear coarse frit and fine frit in a mix of greens was placed around the leaves and full fused. The plates were then trimmed to a square shape and capped with 2 mm clear glass (to make them food safe) and slumped into a dish shape.

I also added a leaf plate made with irridized glass and some wood turned apples that I purchased from a local artist at a craft fair I participated in last winter.

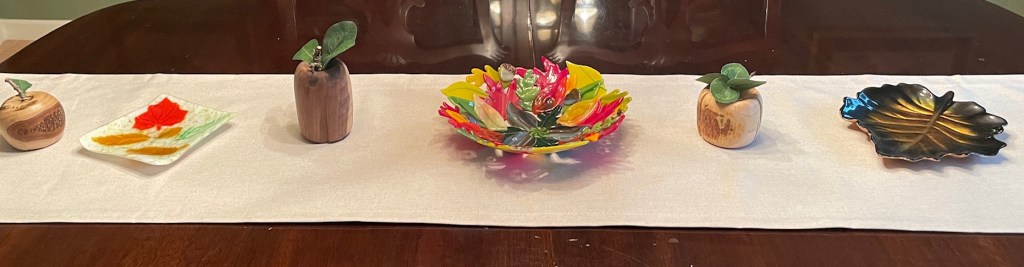
The combination of art pieces make for a lovely table display.

Fall Colors, Fall Fun and a few Fall Glass Projects

Last year, I took a trip to Colorado to see the fall colors in the Rocky Mountains with one of my sons. Unfortunately, we were about a week too late – while the scenery was still beautiful, we dealt with snow and cold.

This year we decided to do our fall color drive about ten days earlier. The fall colors were lovely, as was the weather. The day that I arrived in CO was cold and rainy, so after having a tasty dinner at Sauce on the Blue in Silverthorne, we drove to our villa in Vail. The next day, after waiting for the weather to clear, we left around noon and drove Buffalo Pass through the Medicine Bow and Routt National Forests. On day two, we drove the Top of the Rockies National Scenic Byway. This drive took us from Leadville, over Independence Pass to Aspen for a late lunch. On our third day, we drove the Grand Mesa Scenic Byway and continued south to Ouray, CO. Here we found the Box Canon Park, a mineral hot springs that is tapped and piped to the city pool. On our last day, leaving the mountains, we drove Guanella Pass before I needed to head to the airport and return home to MN. It was a lovely trip enjoying time with my son and God’s wonderful creation.

Last Friday, October 14th, we awoke to snow falling in MN. While it was lovely to see, I was not quite ready for “winter” weather.

Later that day, I left for a weekend getaway to Gull Lake with a few friends. What a wonderful time of conversation (and CE) we had.

Since I am writing about fall, I am including a couple glass projects that I completed this year.

Napkin Holder – made with twisted copper wire, sheet glass and leaf shaped murrini.

Dessert Plates – made with copper Mica, iridized glass cut into shapes of leaves and glass frit.

Tree Votive Holder – made with glass strips / coarse frit slumped over a metal votive form

Wishing everyone a Happy Fall!

Apple Table Runner (& Checkerboard)

With fall weather settling, a week ago, I decided to make a new table runner for my kitchen. This runner was made with apples to depict the bounty of the fall harvest. The runner turned out really nice.

After it was done, I realized that the center section could be used as a checkerboard. All I needed was some checkers.

Originally I thought about purchasing some apple shaped wooden pieces that could be painted. However, when I looked at the options available at the local craft stores, I thought I would need to do some carving of a crown on one side. This, to me, seemed like a lot of work. Then I thought about engraving a crown. This also seemed like a lot of work.

One day, while I was at work, I had a great idea – I could print checkers on my 3D printer. Using Tinkercad, I designed some apples that could be printed. I did try to make the checkers interlock so that they could be stacked for designating a King. This, however, did not turn out well. So, I went back to Tinkercad and designed an indent on one side of the checker that showed a crown. Problem solved.

Having extra fabric, I decided to make a second table runner/checkerboard. This one, I have posted on Etsy. Hopefully someone will like this item.

Fractured Tree

img_2855
“Fractured Tree” wall hanging.

I enjoy reading historical fiction books. When reading, I like to look up information about the events happening at the specific time in history.  This helps me understand the book’s story line better.

I enjoy these books even more when there is a reference to the art of the era.  Having recently I read the latest book by Jennifer Chiaverini, I did some additional reading about the history of quilting.

One of the sources talked about Depression Era quilts.  Many of these quilts were string quilts made of small fabric scraps stitched together to make a piece of fabric large enough to cut a pattern piece. These larger pieces were stitched together to make a quilt block. The quilt blocks were put together to make a quilt top. This method was used during hard times when money and fabric were scarce.  Scraps of all sizes were utilized.


Over the past decade, this method has also made a resurgence within the art quilt community.

stringtreeidea

There were several pictures of a string quilts that have caught my attention.

tuxzkrr

One of the quilters that I really liked was Ursula Kern.  Her string quilts are breathtaking.  The illusion of movement and shape that she creates is absolutely amazing.


birchimg_2759

I decided that I wanted to try to make a string quilt wall hanging for my sewing room.  With wall space limited, the only spot I had left to hang something was adjacent to my four seasons landscape quilt.  So, in keeping the the landscape theme, I thought a tree might fit the area well.


Looking at tree clipart images, I selected one, traced it out on pellon, and then divided the pellon into a 7×11 grid. Each section of the grid (2″ x 3.75″)  was used as one block of the string quilting.

Since I have a lot a scraps from various other quilts, and not wanting to purchase more fabric right now, I pulled out my scraps, sorted them by color and started creating each of the blocks.

img_2811
Pieced, but not quilted.


The seventy seven blocks were sewn together (with numerous changes to match my design better). The illusion is somewhat like a stained glass window – I really like it!

For the quilting, I used one layer of Quilter’s Dream Cotton batting.  To create texture for the tree and shrubs, I placed pieces of Quilter’s Dream Wool batting in these areas between the cotton batting and the pieced top.  The background sky was quilted with straight lines and the tree was loosely quilted to allow the depth of the batting to show.


Fall in Minnesota

img_3654

What a difference a week makes!

Last Sunday, I was in Arizona visiting my parents.  With a high temperature was 102 degrees, I was wearing a skort, sleeveless shirt and sandals.

Today, back in Minnesota, the temperature is 51 degrees.  I am wearing a sleeveless shirt this week, it’s just accompanied by a sweater, slacks and warm socks.

My week off of work started by spending a few days with my parents.  Having recently relocated to a new retirement community, I went to Arizona to see how they were doing.  Glencroft Retirement has many nice features – fountains, library, exercise room, etc.


And entertainment!

IMG_2527

After spending a few days with my parents, I returned midweek to Minnesota.

The later part of my week was spent on fall yard projects.  After picking apples, I spent countless hours making applesauce and dehydrated apple slices – 36 cups of apple chips and 39 pints of applesauce!

IMG_0953


I also cleaned up some of my flower beds and planted about 400 bulbs for spring flowers.  It will be nice to see how things grow!

I guess it’s back to work tomorrow 😒.


Fall has arrived in Minnesota

After a couple rainy weeks, the weather has dried out and we are having a lovely weekend. Today, I spent a few hours outside adding bulbs to my flower gardens. I even put some in planter inserts that fit inside the copper planters at my front door.  It will be nice to see what sprouts in the spring.

In anticipation of the arrival of cooler weather, I have been working on a new bed runner. Since I really love flowers, sunflowers  runner would be nice.

Using my Bernina Cutwork Tool, I cut seventy-two oval from hand-dyed fabrics, 12 leaves and six center from green and brown scraps of fabric.

Since the sunflowers are mainly yellow, I decided to add color in a scrappy border for the runner.

And, a pillow with a scrap piping to add an accent!