
#findhopemn
Creating a Legacy though the things I love – Fiber Arts, Flora, Food, Faith and Fun

#findhopemn
Happy New Year to each of you!
Now that Christmas is over, I can share posts about some of the gifts I made this year.
I really enjoy making gifts to give to friends and family. There is a sense of accomplishment when I can make something unique to give away.
Several of my sons enjoy skiing and snow boarding, so the mountains are a place they like to go in the winter. Hiking and taking photos is another draw of the mountains for them. So, for each of my sons, I made a set of wooden bookends to look like snow capped mountains.
I had seen something similar in a magazine. However, that photo showed only a single mountain on each side supporting the books. My original thought when I saw this was that a 2″ thick hardwood board would not hold up books very well. So, after some thought, I came up with a design for making some more useful bookends.

Unfortunately, I did not have any wood the right size stored in our basement, so I made a trip to Menard to purchase some oak.

Supplies:
2″ x 4″ x 6′ red oak $28.59
1/2″ x 4″ x 4′ red oak $4.69
Various shades of stain, White Acrylic Paint
Polyurethane sealer – these I already had, but can be purchased at any craft or hardware store for about $3.00 each
Total cost was about $9 per set of bookends.

Using a circular saw, I cut six triangles out of the oak boards for each pair of bookends.

The cut boards were then sanded smooth with an electric detail sander. Wood glue was spread between the boards and they were assembled with the smallest triangle placed between the other two sized. Being careful to make sure the bottoms and backs of the boards all lined up even, the boards clamped together and the glue was allowed to dry overnight.
A coat of stain was applied to the entire surface of each bookend. I used four different shades of stain to make each set of bookends unique. Three coats of white paint were used to create the snow caps, and the entire project was sealed with polyurethane. Rubber anti-skid 1/2″ cushions was added to the bottom of each bookend and the projects were complete.


I hope my boys enjoy using these in their various apartments.

With Christmas just a few days away, I decided to show some holiday treats I have recently shared with my staff.
Christmas Village
For our December Saturday clinic, the staff enjoyed an eatable village that included:
Pound cake houses (each staff member could have their own house):
Spritz cookie Trees (recipe found here, peppermint extract used instead of fiori di sicilia)
Marshmallow cereal trees (recipe found here, shaped into trees rather than wreaths)
Cream wafer cookies (recipe found here) – these are really good!!


Meat and Cheese Tree
On another day, a demonstration of a new piece of equipment we are considering, was held over our lunch break. So, I brought in some meat and cheese for the staff to eat. Keeping with the holiday spirit, these were put together in a decorative fashion.

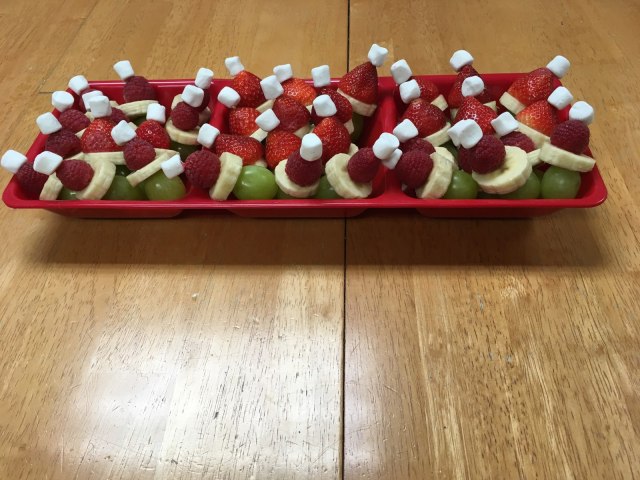
Grinch Poppers
After seeing the idea in an ADA Morning Huddle email, I also made a tray of fun fruit treats. These Grinch Poppers (original idea posted here) were enjoyed by everyone.
Merry Christmas to everyone who reads my blog!!
Taking a few days off of work gave me some time to start my holiday baking. With a son who is on a low sugar and low gluten diet (not for any medical reasons, it’s just healthier), I worked out a few new recipes.
Having read somewhere that Stevia can be substituted for half of the sugar when baking, I decided to try to make cookies with a lower sugar content. Using the traditional Tollhouse Cookie recipe as the base, I made some mint flavored cookies. You really couldn’t tell that there was less sugar in them than the normal recipe.
Mint Chip Cookies
Makes 4 dozen
2 1/4 cup flour
1 teaspoon baking soda
1 teaspoon salt
1 cup butter
3/4 cup granular sugar
3/4 cup Stevia
2 eggs
1 teaspoon vanilla
Green food coloring
1/2 cup Mint Chocolate Chips
1/4 cup Dark Chocolate Chips
1/2 teaspoon shortening
Preheat oven to 375 degrees F. Combine flour, baking soda and salt. Beat butter, sugars, vanilla and coloring until creamy. Add eggs, one at a time, beating well after each addition. Gradually beat in flour mixture. Stir in chips. Drop by spoonfuls onto ungreased baking sheets. Bake for 10-12 minutes until bottoms are light brown. Cool slightly, then transfer to wire rack to cool completely. Heat dark chocolate in microwave until starting to melt. Fold in shortening and mix until creamy. Drizzle chocolate over cookies.
Yummy!!
 Next, I decided to try making a new recipe from Better Homes and Gardens, but modified to use Gluten-free Flour (King Arthur Measure for Measure). The first batch I made tasted great but was extremely crumbly. For the second batch, I added an egg to the mix. This gave the dough enough binder to hold the cookies together.
Cherry-Walnut Balls (modified)
Makes 4 dozen
1/4 cup coarsely chopped maraschino cherries
1 cup butter
1/2 cup powdered sugar
1 eggs
1/2 teaspoon almond extract
1/2 teaspoon vanilla extract
2 cup Gluten Free Flour (KAF)
3/4 cup Chopped walnuts
Preheat oven to 325 degrees F. Drain the maraschino cherries on paper towels. Beat butter on high for 30 seconds. Add sugars, egg and flavorings and beat until creamy. Gradually beat in flour. Stir in nuts and cherries. Drop by spoonfuls onto ungreased baking sheets. Bake for 18-20 minutes until bottoms are light brown. Cool slightly, then roll in powdered sugar to coat and transfer to wire rack to cool completely.
Lastly, I planned to make my personal favorite – Red Velvet Thumbprint Cookies. However, when I looked into my pantry, I realized that I had some lemon wafers that needed to be used up. So, I decided to try to alter the recipe and make a lemon-lime flavored version.
Lemon-Lime Thumbprint Cookies
Makes 5 dozen
1 cup butter
1 cups sugar
1 egg
1 teaspoon Vanilla
1 teaspoon Green Food Coloring
1/2 teaspoon Baking Soda
1/4 teaspoon salt
1/2 teaspoon lime juice powder (KAF)
2 1/2 cups flour
Lemon melting wafers (KAF)
Preheat oven to 350 degrees F. Line baking sheet with parchment paper. Beat butter and sugar until light and creamy. Stir in egg, coloring and vanilla. Mix together dry ingredients and stir into butter-sugar mix. Shape into 1 inch balls, roll in sugar and place on baking sheet. Bake 12 minutes. Remove from oven and immediately top with melting wafer. Cool slightly, then transfer to wire rack to cool completely.
A year ago, with Thanksgiving approaching, I decided to make a decorative fused glass plate for my kitchen. 

All went well until I placed the glass in a ceramic mold to slump it into a plate form.
Unknown to me, the contractor that was doing some work in our family room shut off the power to a few circuits. The power to my kiln was interrupted and when I returned from work and opened the kiln, my plate had cracked. Bummer!
Unfortunately, this meant that my plate was not ready for Thanksgiving last year.
So… back to cutting and heat fusing.

This time, all went well and I now have a plate to display for Thanksgiving this year.

To salvage the cracked glass, I broke it into smaller pieces, pot melted the pieces and made a beautiful melt plate.
")
")


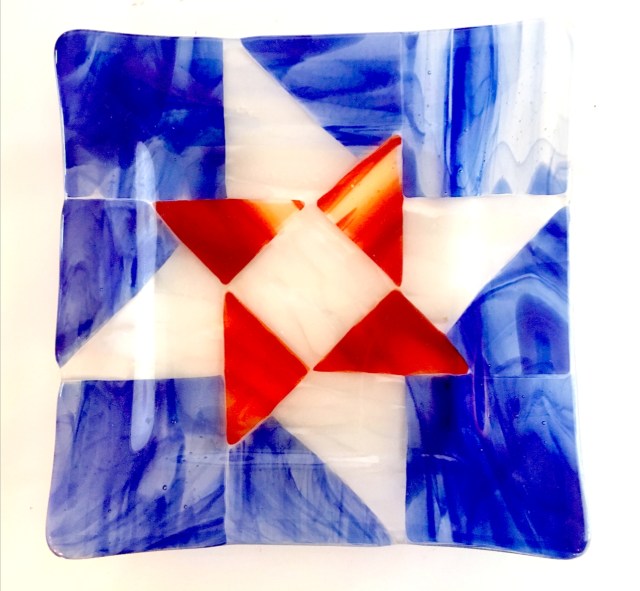
In honor of our American Independence Day, I am posting a picture of a glass plate that I made which combines two of my favorite crafts, quilting and fused glass.
The design is based upon the Friendship Block. The pattern is two of these blocks of different sizes superimposed upon one another to make a single block.

It is possible that the resulting block design has another name. If so, I am unaware of it.
Yes, I know, I am not Greek Orthodox, nor am I from any of the countries that observe Orthodox Easter. But, since we were traveling last Sunday, we had our Easter celebration today. And, since Easter is a celebration of Christ’s resurrection, shouldn’t we celebrate every day of the year!
He is risen indeed. Ἀληθῶς ἀνέστη!
Prior to leaving for Spring Break, I spent some time making an Easter plate for my kitchen plate holder. I think it turned out really well.

The creation of this plate involved several steps: