Soy Wax Dye Resist

I am finally getting around to trying soy wax as a dye resist.  Soy wax has the benefits of melting at a lower temperature and being much easier to remove than traditional batik waxes. In addition soy wax is sourced from a renewable resource and helps to support our farmers!

Safety Tip: Any wax, including soy, is flammable when allowed to heat to too high a temperature. Treat the technique with respect and ensure that the wax does not overheat. Use these safety tips for best results:
– Use a dedicated pan or wax pot that has controls to regulate the temperature,
– Always turn off or unplug the appliance when leaving your work area,
– Do not leave heated wax unattended at any time,
– Do not leave your tools in the wax pot when not in use. They can be damaged or broken.
– Arrange your space with safety in mind,
– Keep the area clean and tidy, protect surfaces with newspaper, old sheets or towels,
– Situate your wax pot and electrical cords as close to the electrical outlets as possible
   (do not place the cords where they could be walked or tripped over), and
– Do not to use tools that are wet, the wax will not stick to the tool and may spit wax at you, and

Soy wax has a lower melting point than traditional batik wax. Generally a temperature between 125° F – 150° F works best. Check the temperature on your equipment to find the optimal settings. The wax should be hot enough to penetrate the fabric and appear translucent. If the wax beads up or looks milky on the fabric, then it is not ready for application. Either wait a couple minutes or check the temperature of the wax. Soy wax will act differently with different fabrics, generally the heavier the fabric, the longer the wax will take to penetrate and the more wax will be required for a complete resist. Soy wax penetrates light weight fabrics, such as cotton, silk, rayon and linen better. 

Tools and Supplies: 
Most of the tools used for soy wax application can be found in hardware or thrift stores.
– Natural bristle brushes in a variety of widths-from 1/2″ to 2″-3″
– Sponges – cellulose sponges work best, their fibers stand up to repeated wax applications and can be cut into various shapes
– Metal Kitchen tools – mashers, serrated vegetable cutters and such can give interesting texture with wax application.
– Cardboard shapes – tubes, boxes, etc.
– Chemical Water: 1 cups lukewarm water 2 Tablespoons Urea Granules (urea helps to retain moisture and keep the dyes from drying in storage or when painted on fabric
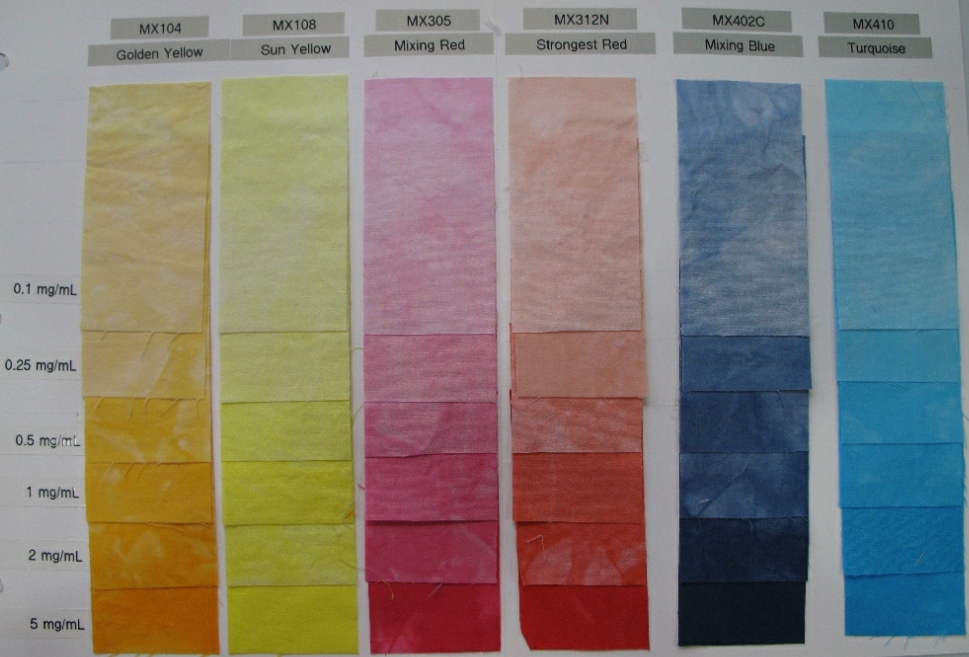
– Dye Concentrate solutions dissolved in chemical water

Instructions:
1. Prepare fabric for dyeing (either purchase PFD fabric or wash in Blue Dawn). 
2. Soak fabric for 15 minutes in soda ash solution, wring lightly and hang to dry.  Do not place soda ash treated fabric in the clothes dryer as it will leave a film in the drum. Remove wrinkles with a dry, cool iron. Pretreated fabric can generally be stored for a few weeks.  However, if working silk fabric, use within 5 days of pretreating with soda ash as the chemicals can break down the silk fibers.
3. If drawing a pattern, transfer your design onto the fabric with washable marker or soft pencil.
4. Stretch the fabric on a fabric stretcher or by taping to a hard surface.
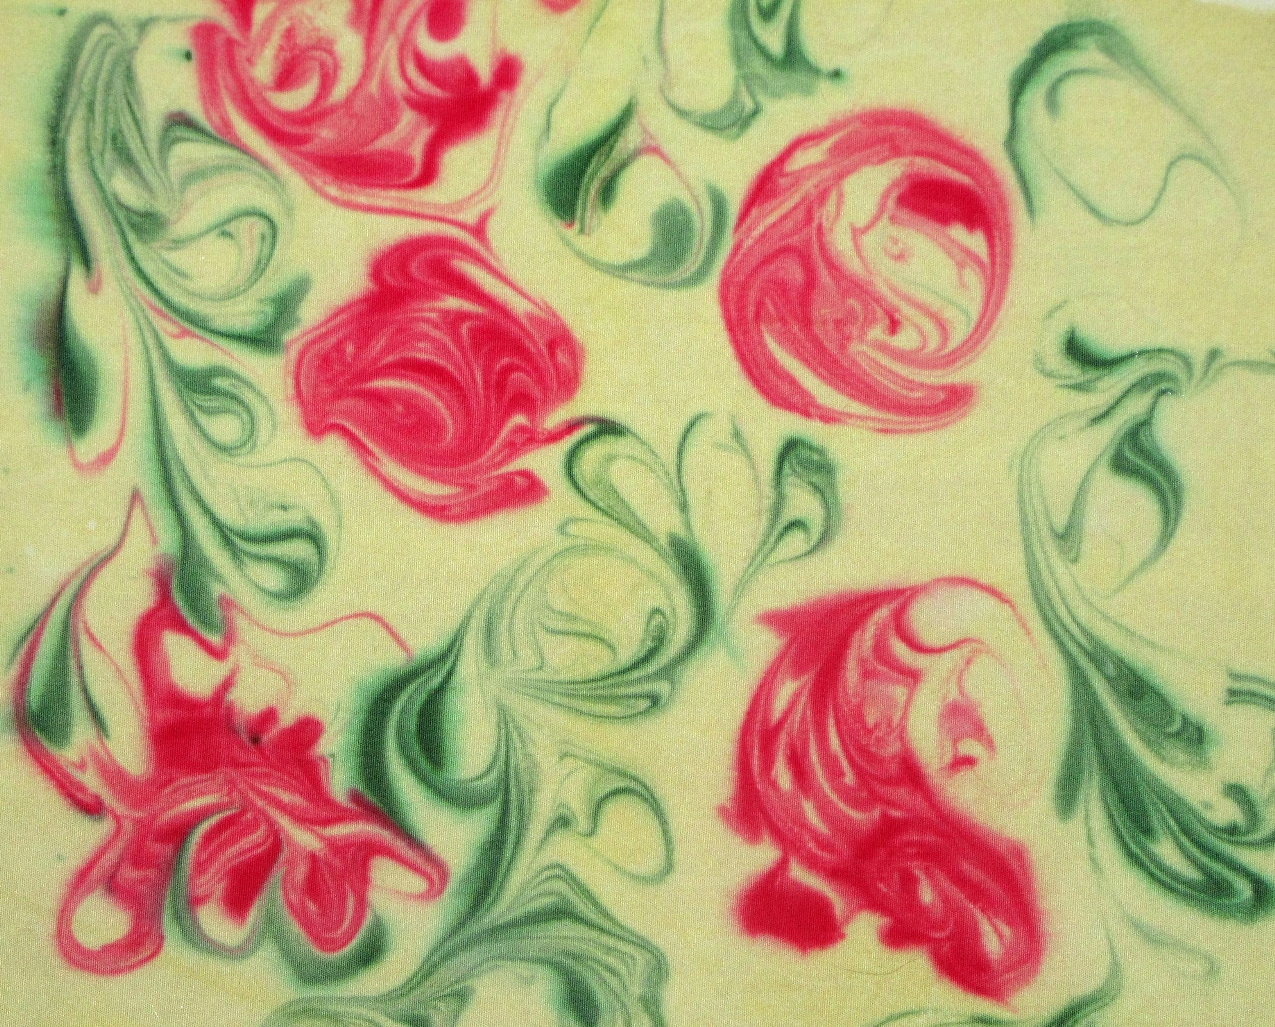
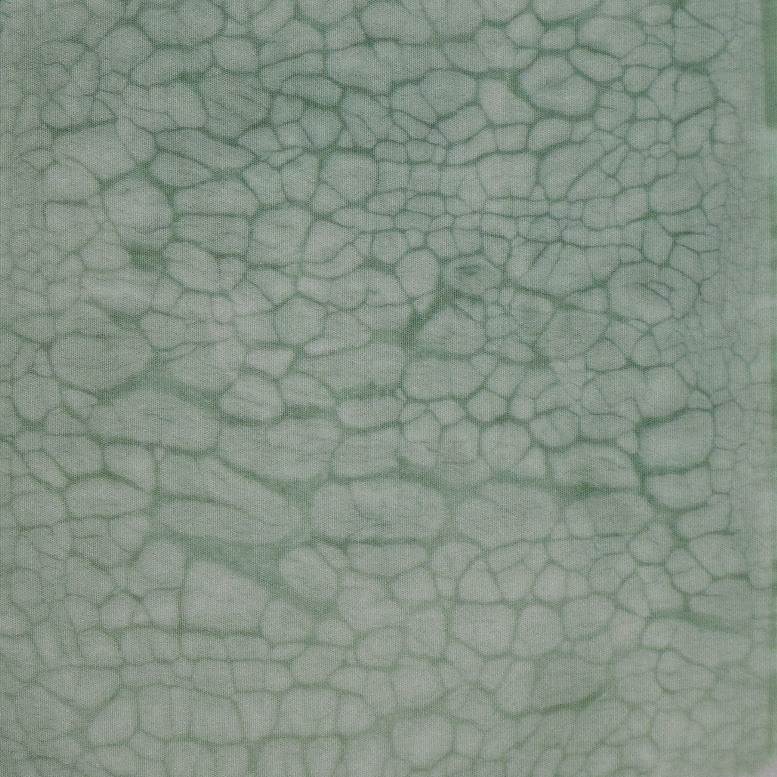
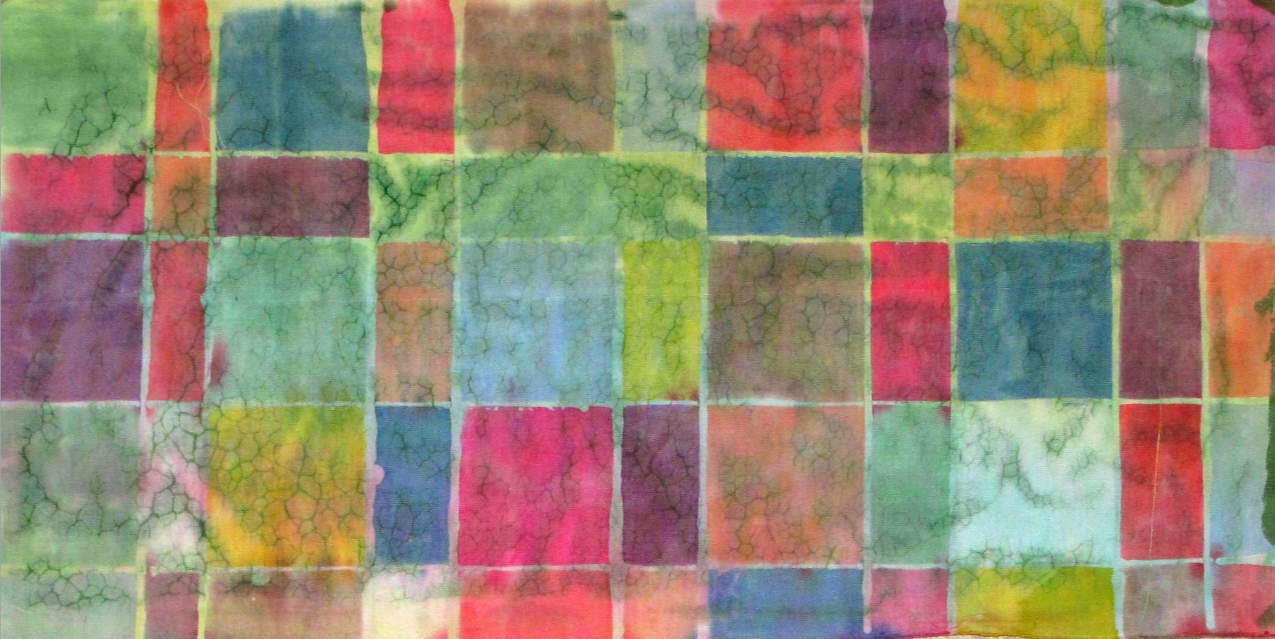
5. Melt the soy wax in a glass container warmed over a heating plate. Put your tool in the wax for about one minute for adequate uptake of wax. Allow the wax to cool.  Once the wax on the front of the fabric is cooled, turn it over and wax any areas that did not penetrate completely. The soy wax should appear clear when you apply it and your fabric should be translucent when the soy wax cools. Since soy wax is brittle when cold, the wax design often cracks when the cloth is handled. Dye seeps into the cracks making the characteristic web-like pattern known as crackle.
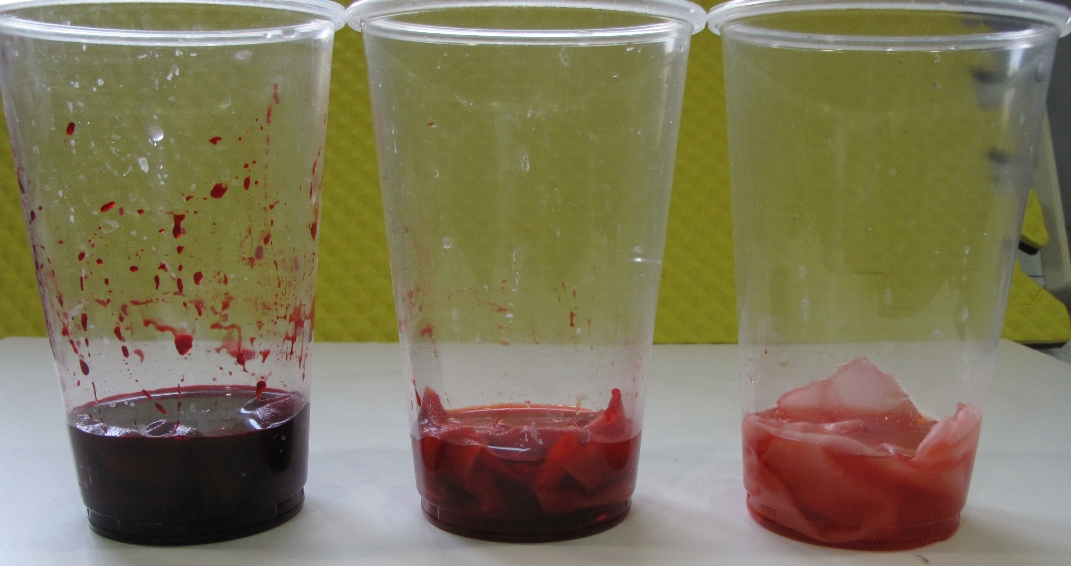
6. Immersion dye similar to previously described.  Note – soy was melts at a lower temperature than batik or paraffin was.  So, be careful with the temperature of your dye bath, generally keeping the temperature under 95°.   If you want to avoid a lot of crackle, use a flat tray or bin to hold the dye so the fabric does not have to fold. This way the fabric stays flat so you can control the amount of crackle. Alternatively, dye solution can be painted on the fabric and then covered with plastic to retain the moisture.
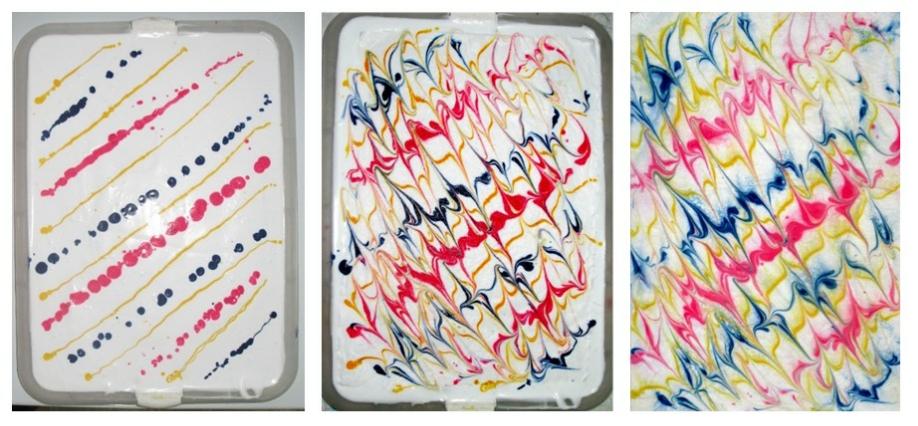
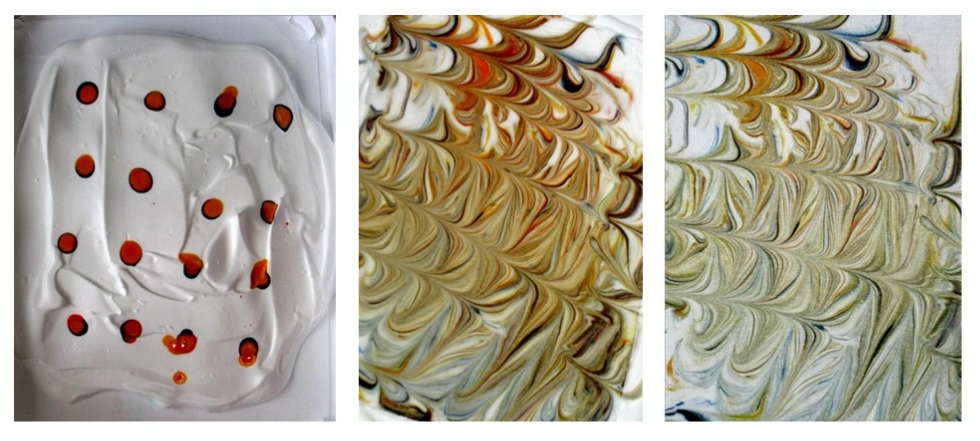
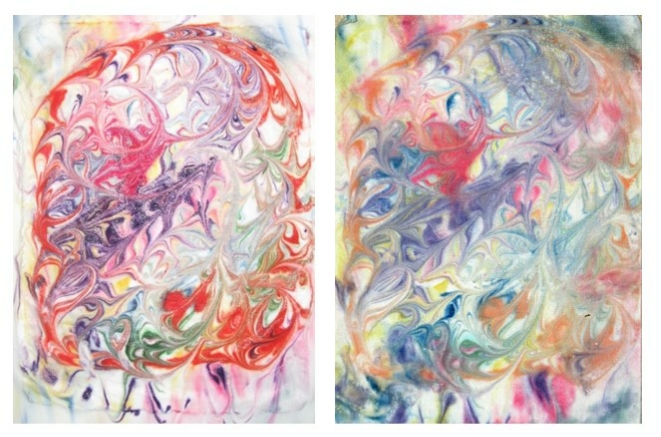
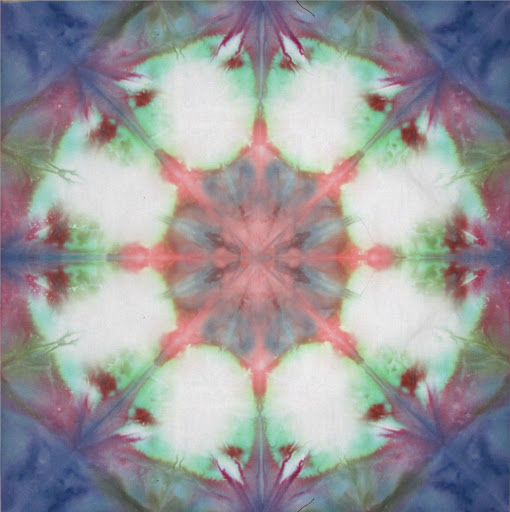
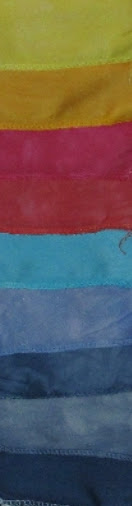
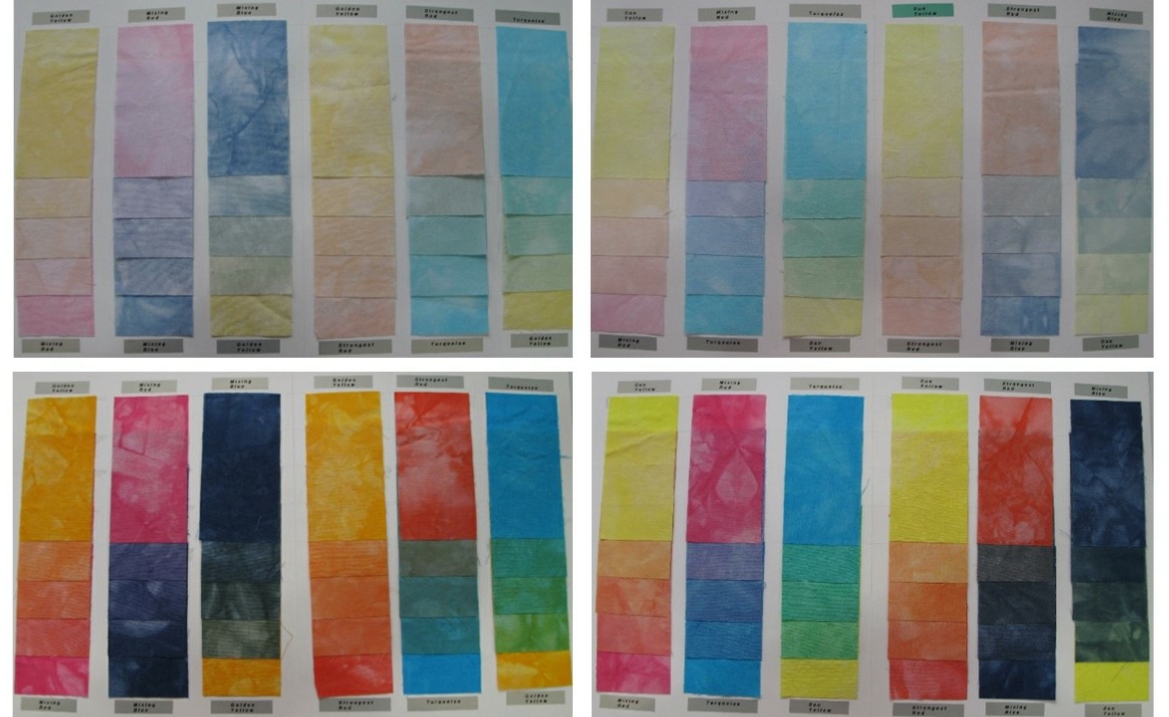
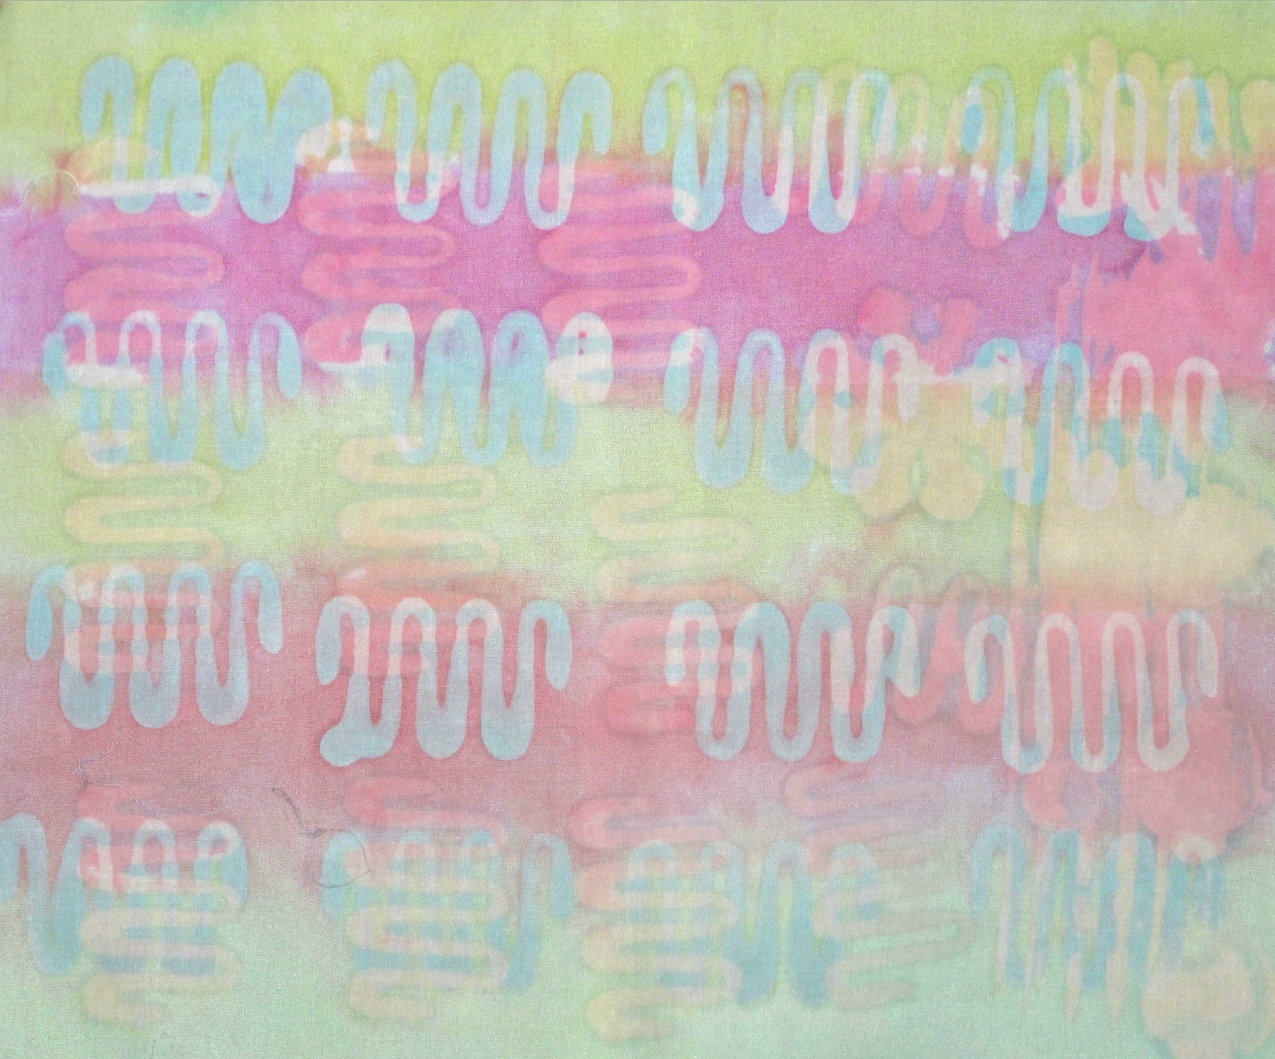
7. Successive dye treatment can build color. Dye the lightest color first progressing to the darkest. Since the colors are dyed one on top of the other, except where the fabric is waxed, they combine to produce new colors. For example, if the first color is yellow and the second color is blue the mixture creates green. Similarly, if the first color is red and the second color is blue the mixture creates purple. In either example, you cannot obtain blue, only mixtures with blue. It’s helpful to know basic color mixing to take advantage of this aspect and be prepared to experiment with color mixing. It is important to plan the dye color order before beginning.
8. Batch at RT for 4 hours. Rinse fabric in cold water.
9. Wash in hot water with Blue Dawn soap. Rinse, dry and iron.

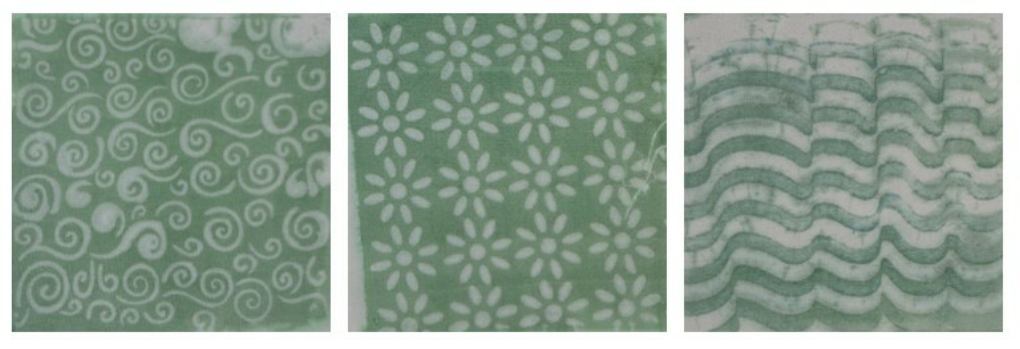
First Trial – Tools:
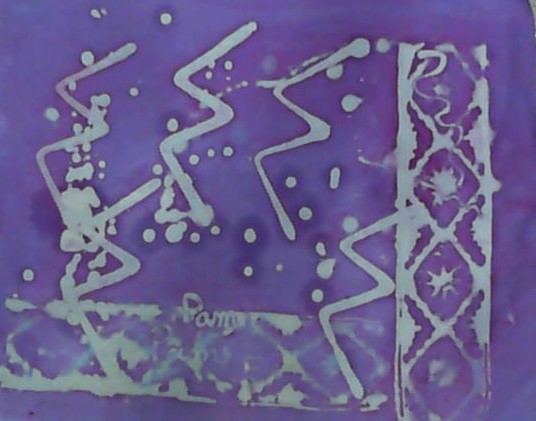
Folded cardboard used to make “E” shapes
Copper Tjapp – normally used for batik patterns
Metal Tjanting – used to write my name

Lessons Learned :
Wax drips – hold a cloth under the tool you are using to catch the drips.
Tjapp -I had tried unsuccessfully with batik wax, her I still do not like the way they worked with the soy was.  I will reserve them for Paint Stick rubbings.
Tjanting – worked well to draw lines and shapes.


Second Trial – Tools and Techniques:

Potato smasher
Over-dyeing

Lessons Learned :
Potato smasher worked well.
Over-dyeing add nice dimension to the color

Third Trial – Tools and Techniques:
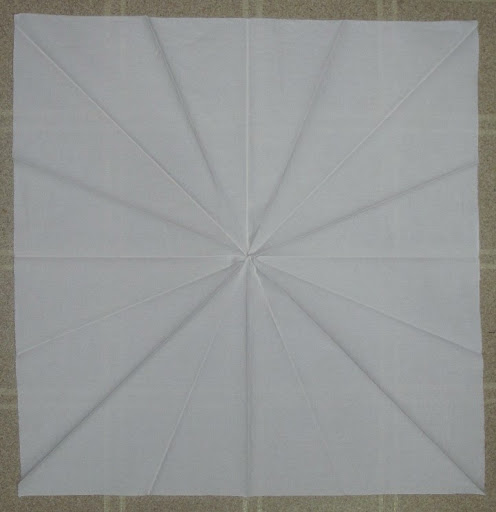
Tjanting grid lines
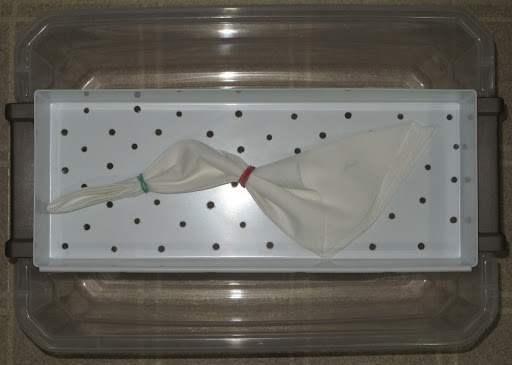
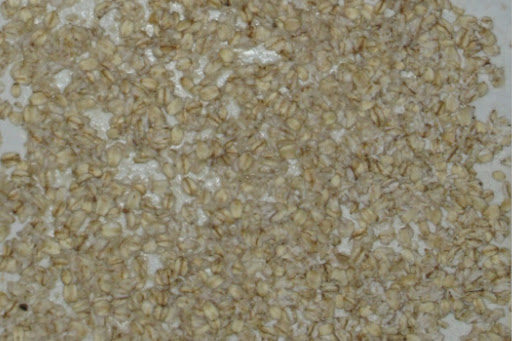
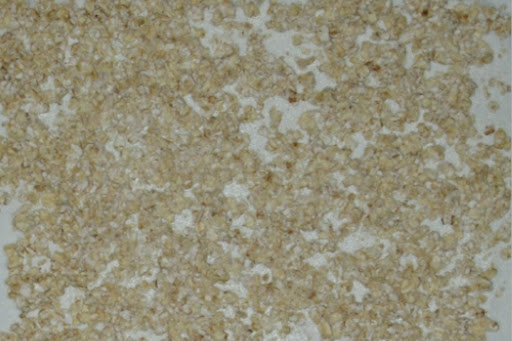
Selective dyeing over fabric previously dyed with oatmeal resist

Lessons Learned :
Nice way to control the placement of color.

Fourth Trial – Tools and Techniques:
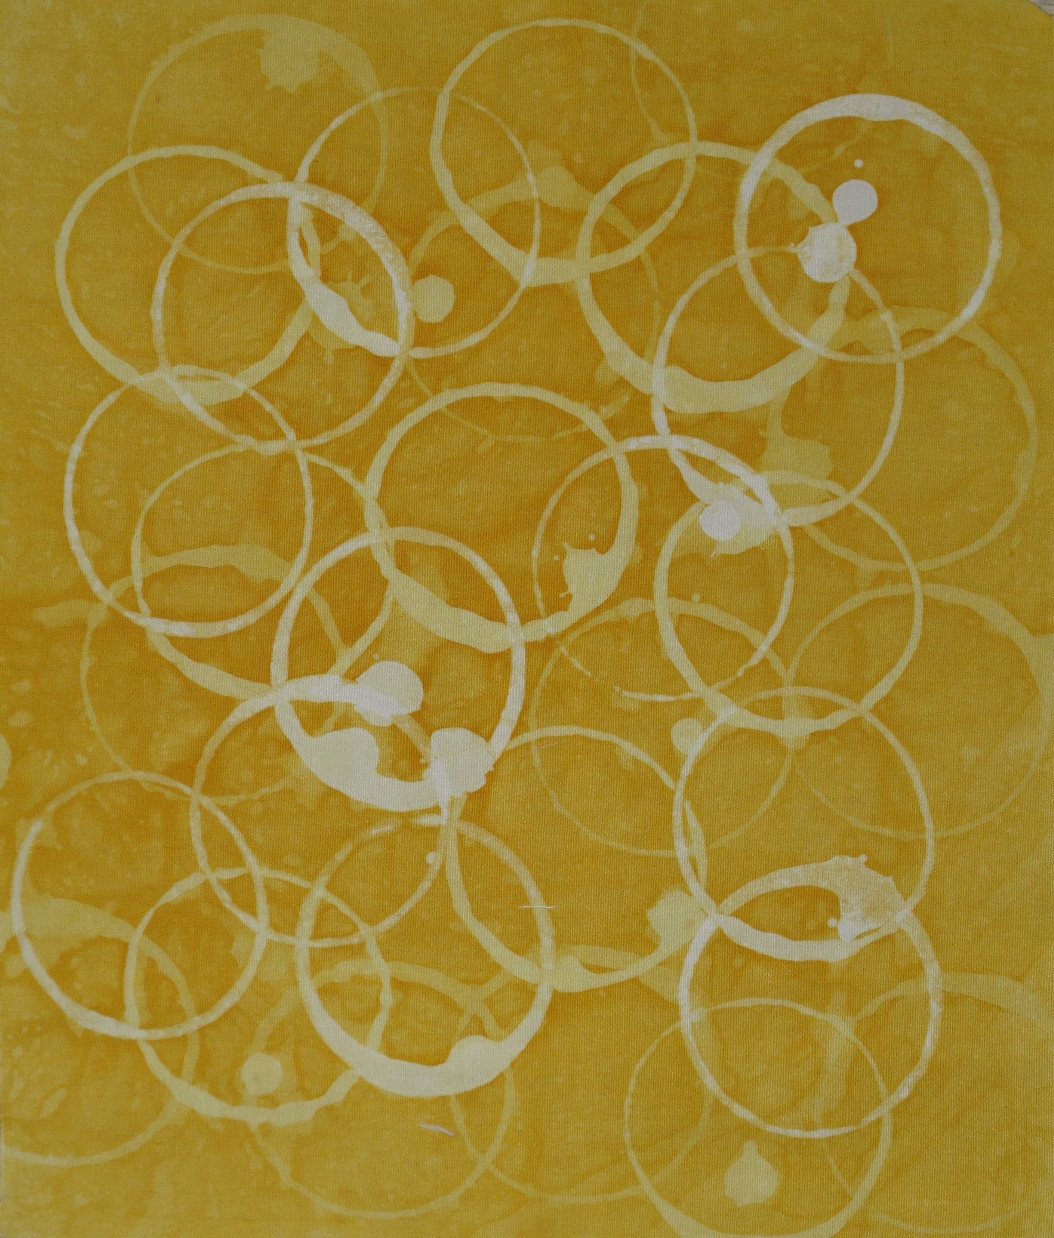
Cardboard tube wax stamping
Over stamping and over-dyeing with same color

Lessons Learned :
Cardboard tubing works really well with soy wax stamping.
Over stamping and over dyeing  creates interesting patterns.

Marbling with Shaving Cream

Looking for some ways to create unique fabrics, I looked through the tutorials on-line at Dharma Trading.  Marbling fabric looked like a fun thing to try, but I didn’t want to invest in more expensive supplies and different dyes.  But, there was one technique that caught my eye because it did not involve significant purchase of additional supplies – Shaving Cream Dyeing.  The technique they described used the type of dye that I already had in my supply – fiber reactive MX dyes.  The only supply that I would need was shaving cream.  So, I bought a can and decided to give it a try.

Supplies Needed:
100% Cotton Fabric
Procion MX dye
Soda Ash dye fixer
Squeeze bottles for prepared dyes
Foam shaving cream with aloe (I used Barbazole brand)
Non-softened water (or Distilled water)
Flat shallow plastic pan
Mixing container, plastic spoon
Blue Dawn dish soap
Instructions
1. Prepare fabric for dyeing (either purchase PFD fabric or wash in Blue Dawn).
2. Soak fabric for 15 minutes in soda ash solution, wring lightly and hang to dry.  Remove wrinkles with a dry, cool iron. 
3. Dissolve dye powder (10mg/ml) in lukewarm distilled water (No soda ash fixer!) and place in squeeze bottle.  If soda ash is not added to the dyes, they can be stored and used again on another day. 4. Spray shaving cream into a container and add an equal volume of distilled water to the container.  Mix well with a plastic spoon and pour mixture into shallow plastic pan
 and tap pan on flat surface to allow the mixture to settle with a smooth surface.  
5. Drip diluted dye onto the surface of the shaving cream in any pattern you wish.  Use a comb, chopstick or any other tool to swirl and spread the dye into fun patterns. 
6. Place the prepared fabric on the surface of the shaving cream and dye pattern.  Remove any air bubbles by pushing down gently with a gloved hand.
7.  Allow the fabric to sit on the surface of the dye/shaving cream for 5 minutes, then remove the fabric by lifting carefully.  Place the fabric on a flat surface with the shaving cream side up. Cover with plastic to retain the moisture.  Allow to batch for 4 hours.
8. Rinse fabric in cold water to remove the shaving cream and soda ash.  Then wash in hot water with Blue Dawn. Dry and press and enjoy the results!

First Trial – turned out nice, but need more dye.

Second Trial

Third Trial – Fun Swirls
Last Trial – Kinda look like roses and petals!

Mandala Dyeing 2

My fourth attempt:

  • Combed cotton 22″ x 22″.
  • Fold and iron fabric.
  • Soak in warmed soda ash solution for 30 minutes.
  • Place in tray over bucket.
  • Place 8 cups of fresh snow over the fabric.
  • Mix dye with snow. Orange, Mixing Red and Royal Blue  1/2 teaspoon of each dye mixed with 8 cups of snow and packed over the fabric.
  • Place lid over the bucket and allow to sit at room temperature.
  • After 24 hours, rinse fabric in cold water.
  • Wash in hot water with blue Dawn soap.
  • Rinse, dry and iron.
Lessons learned:
  • colors are brighter, but still too much white, 
Things yet to learn
  • The amount of dye needed to migrate through the full thickness of the folded fabric.
  • The impact of clamping the fabric. 

My fifth attempt:

  • Combed cotton fabric 12″ x 18″ folded accordion style into eight sections, then fold in half or in thirds lengthwise.  Clamp one with large forceps.
  • Fold and iron fabric.
  • Soak fabric in warmed soda ash solution for 30 minutes.
  • Place fabric in tray over bucket.
  • Mix dye with snow: Golden Yellow, Mixing Red and Royal Blue (3/4 teaspoon of each dye mixed with 8 cups of snow) and packed over the fabric.
  • Place lid over the bucket and allow to sit at room temperature.
  • After 24 hours, rinse fabric in cold water.
  • Wash in hot water with blue Dawn soap.
  • Rinse, dry and iron.
  • Lessons learned:
  • colors are very bright and reached through 24 layers of fabric.
  • some undissolved dye particles made spotty marks on the first layer of fabric that the dye penetrated.
  • clamping was effective to give some controlled areas of blocked dye penetration.
After several additional trials, I have learned that I can selectively control the intensity of the resulting color by placing varied amounts of fresh snow (no dye added) over the fabric before packing the dye mixed snow.

My final attempts: 

  • Combed cotton fabric 22″ x 22″.
  • Fold and iron fabric.
  • Soak fabric in warmed soda ash solution for 30 minutes.
  • Place fabric in tray over bucket.
  • Cover with scrap fabric to collect undissolved dye particles.
  • Mix 1/4 to 3/4 teaspoon of dye powder with varied amounts of snow.
  • Pack fresh snow and snow-dye mixture over the fabric with varied positions
  • Place lid over the bucket and allow to sit at room temperature.
  • After 24 hours, rinse fabric in cold water.
  • Wash in hot water with blue Dawn soap.
  • Rinse, dry and iron.

Really happy with these!!

Mandala Dyeing

When I was first learning about fabric dyeing, I read about many different techniques.  One that I tried and really enjoyed was a technique known as snow dyeing.  And, living in Minnesota, we certainly have plenty of snow each year to play with!
After trying some small samples, my first major piece that I dyed was the backing to my dyed fabric quilt (see Sept 22, 2015 post for more information).  I wanted the back of the quilt to complement the pieced from quilt, so I snow dyed with my six main dyes.  I then folded the fabric in a manner that brought all of the borders together and over-dyed the edges with black dye. The result was very nice and looks much better in person than in this photo.

Now that there is a fair amount of snow outside, I decided to take my snow dyeing one step farther – Mandalas.  Looking around any craft store or art supply store, you will see adult coloring books.  Many of these have mandalas for coloring.

The word “mandala” is from the classical Indian language of Sanskrit.  Loosely translated to mean “circle”.  However, a mandala is far from the simple shape we think of as a circle.  It is a complex structure with overlapping lines of shape and color.
Unable to find specific instructions for snow dyeing mandalas, I decided that some experimentation would be necessary.

My first attempt:

  • Combed cotton fabric 22″ x 22″, soaked in warmed soda ash solution for 30 minutes. 
  • Remove the fabric from the solution and squeeze the excess liquid from the fabric.  
  • Hang to dry for 24 hours.
  • Iron the folds into the fabric.
    Unfolded fabric to show the pleating created by the folds


Folded fabric


Bucket with two folded pieces of fabric
  • Place folded fabric in drain tray.  I used a drawer organizer with holes drilled in the bottom. The organizer was then set above a large storage bucket to collect the melting snow.
  • Cover the fabric with snow.  Make sure that there is no fabric visible.  I used about 8 cups of snow.  
  • Sprinkle a total of 1/2 teaspoon of Procian MX dye over the snow.  I used several colors hoping for some colors blending together.  
Fabric covered with snow and sprinkled with dye powder.
I forgot to take a photo right away.
The above photo was taken after three hours.
You can see that the snow had melted and the dye powder had blended a bit.
  • Place the lid over the bucket (mostly to keep the cat out of the dyes) and allow to sit at room temperature for 24 hours.
  • After 24 hours, rinse fabric in cold water.
  • Wash in hot water with blue Dawn soap.
  • Rinse, dry and iron.
Lessons learned:
  • too much white, I need to add more dye.  
So, I checked for any suggestions on-line. One site stated that the colors were more vibrant if the dye was mixed directly with the snow.  I will give that a try.

And, to save time, I realized that snow melting over fabric will make the fabric wet (I certainly didn’t need Sherlock to help me make that deduction). So, next sample I will use the fabric immediately after soaking in the soda ash solution.

I also wanted to see what happened if I used preprinted fabric.  I was hoping that this might be a nice way to make my own fabric, but still have a pattern printed on it.

So, another experiment to try.

My second attempt:

  • Printed white-on-white cotton fabric 18″ x 22″, soaked in warmed soda ash solution for 30 minutes. 
  • Remove the fabric from the solution and squeeze the excess liquid from the fabric.  
  • Place damp fabric on table and fold for desired dye pattern
  • Place in tray over bucket
  • Mix dye with snow.  I used Mixing Blue, Golden Yellow, Mixing Red.  1/4 teaspoon was mixed with 8 cups of snow and packed over the fabric.
  • Place lid over the bucket and allow to sit at room temperature.
  • After 24 hours, rinse fabric in cold water.
  • Wash in hot water with blue Dawn soap.
  • Rinse, dry and iron.
I did take a picture of the fabric before dyeing.
Unfortunately white on white does not show very well.
So, I’m not posting that picture. But, this is the dyed result. 
Lessons learned:
  • colors are brighter – but, I think just a bit more dye would be even better
  • printed fabric looks nice, but maybe not for mandalas since it tends to distract from the pattern created by the dyes.

Looking at more on-line ideas, I found a site that used rubber bands to bind the fabric to create more detail in the mandala.  And, another site that used the microwave the speed up the dyeing process. So, more experiments to try.

My third attempt:

  • Combed cotton fabric 22″ x 22″ folded and bound with rubber bands. 

  • Soak in soda ash solution for 30 minutes
  • Place in tray over bucket

  • Mix dye with snow and packed over the fabric.
  • Place lid over the bucket and allow to sit at room temperature.
  • After the snow had melted, approximately 6 hours, place the fabric in a plastic bag.
  • Microwave on High for 30 seconds, wait 2 minutes.  Repeat 4 times.
  • Rinse with cold water.
  • Wash in hot water with blue Dawn soap.
  • Rinse, dry and iron.

Lessons learned:
  • Rubber bands left uneven marks on the fabric.  I liked the folding better.
  • Microwaving the dyes caused the colors to be more muted.
I do love this technique, but I still need to perfect my “formulas”.

Dye Resists – Oatmeal

Now that the holidays are over, I have time to get back to some more fabric dyeing. I have a bed runner that I want to make that will have appliqued flowers, which I plan to use only hand-dyed fabrics for. So, I need to get more fabric pieces made. To create some variety in the fabrics, I will be using several dye resist techniques. In addition to dextrins (see October 30, 2015 for details), there are a variety of other techniques to use for dye resists.  One that I wanted to try (because it was readily available and rather inexpensive was oatmeal resists.

I started by washing my combed cotton fabric in Blue Dawn (works the same as Synthrapol, is cheaper, and doesn’t require ordering – you can buy it at any grocery store) to remove any sizing.  The fabric was soaked in a solution of Soda Ash and allowed to hang dry. Once dry, the fabric was securely stretched on a hard surface, which was covered with a thin piece of plastic. Small binder clips worked well to secure the fabric to an old floor linoleum tile.

I tried out three different approaches for the oatmeal resist.
1. Slow Cook Oatmeal – 1/4 cup oats mixed with 1/3 cup water and microwaved on High for two minutes. Cooled to room temperature. The oatmeal mixture was spread over fabric using a 4″ plastic putty knife.  You can get a set of three putty knives (2″, 4″ and 6″) at Home Depot for less than $3. Allow to dry completely (approximately 24 hours).

Slow Cooked Oatmeal

2. Quick Oats – 1/4 cup oats mixed with 1/3 cup boiling water. Cool to room temperature and spread over fabric similar to the technique described for slow cook oatmeal.  Dry completely. Note – this mixture was extremely sticky and hard to spread.  So, that prompted me to try a different approach to using the Quick Oats.

Quick Oats

3. Sprayed Oats –  the stretched fabric was sprayed with warm water to saturate the fabric.  Quick Oats were sprinkled over the surface and then sprayed again with hot water to saturate the oats.  So secure the oats to the fabric, a paper towel was placed over the oats and the surface was rolled flat with a rolling pin.  Remove and discard the paper towel and allow the fabric to dry completely.

Quick Oats – Sprayed

To dye the fabrics, I tried several approaches.  First, I tried to brush on a mixture of thickened dye. Unfortunately, this approach caused the oatmeal to be pulled off of the fabric.  Next I tried to brush on a dye solution (without thickener).  This worked a bit better, but the dye needed to be tapped on the fabric rather than spreading with the foam brush to avoid moving the oatmeal  Lastly, I put the dye solution (1 mg.ml, no thickener) in a small spray bottle and sprayed the dye onto the oatmeal coated fabric.  This worked really well, but had the potential to be really messy. So, to keep the dye aerosol from making a mess of my laundry room, I put the fabric inside a plastic bag and sprayed the dye into the opening of the bag.  This was actually a good approach since the fabric needed to “batch” for 24 hours and the plastic bag helped to keep the fabrics from drying out.

Slow cooked oats                                            Quick Oats                                            Quick Oats – sprayed

After 24 hours, to wash out the oatmeal and excess dye, I added about a cup of hot water to each plastic bag and allowed them to soak for 30 minutes.  Since the oatmeal was really sticky, it is somewhat frustrating to try to hand wash it off of the fabric.  Instead, I found that if I removed the binder clips that were holding the fabric to the tile, I could then just pour the fabric and dye solution directly into the washing machine.  The fabrics were washed with Blue Dawn and dried.  
I really liked the results:
Additional samples:
Can’t wait to try some more fabric dyeing approaches!

Dye Resists

When learning to dye fabrics, I recalled my teenage years when tie-dye was so popular.  Tie-dye is probably the best known form of a type of dyeing called resist-dyeing. So, I decided to investigate this category of techniques. What I found was fascinating to me.

Resist dyeing refers to traditional methods of dyeing fabrics to create patterns and has been widely used since antiquity.  The oldest example of resist dyeing was pieces of linen from Egyptian mummies and dates to the fourth century. The cloth was soaked in wax, scratched with a sharp tool, dyed with a mixture of blood and ashes, and then washed with hot water to remove the wax. The technique was also used in China during the T’ang dynasty as well as India, Japan and Africa.

These methods are used to “resist” or prevent the dye from reaching all of the cloth, thereby creating a unique pattern.  Common resists include wax, starch paste, tying or stitching.  The most well-known varieties are tie-dye and batik.

Traditional Batik:

The first technique I tried was traditional batik.  I love the look of batik fabrics and wanted to try to make my own.  But, after trying the technique, I think I will leave this form of resist dyeing to the wonderful craftsmen in Indonesia.  For a really good video on the process of batik – check out this Indonesian Batik Process video.
I found was that the tradition wax had a disagreeable odor, was difficult to get to melt properly for the intricate designs that I wanted to make and was very messy to remove from the fabric.  Perhaps I was too critical of my results, but I really wanted to find an easier way. Some day I may try low temperature Soy Wax for batik.

So, moving on to other techniques. ProChemical and Dharma Trading sell several starch resist – Potato Dextrin and Corn Dextrin amongst them.
Note: Potato and Corn Dextrin are not intended for immersion dye baths, as they are water soluble.

Potato Dextrin:

Potato Dextrin produces lace-like patterns and crackle lines, similar to batik.
Steps:

Combed Cotton, Potato Dextrin Resist, Green Dye

1) Potato Dextrin Paste.  Manufacturer’s directions state to bring 1 cup of water to boiling, slowly whisk in 1.25 cups of dextrin into the water and cool to about 80 degrees. Anyone who does much cooking knows that adding any type of starch to hot  water is very difficult – it simply clumps up too easily.  My first several attempts followed the manufacturer’s directions with successful results but plenty of frustration making the paste. So, I actually add the dextrin to cold water and then microwave for one minute.
2) Stretch fabric on a hard surface, which is covered with a thin piece of plastic. Tape fabric or secure with pins every ½ inch.
3) Squeegee a smooth layer of paste on the fabric. The paste thickness determines the amount of crackle. In general, the thinner the paste, the finer the crackle; the thicker the paste – the larger the crackle.
4) Allow the cloth to dry completely while it is still stretched. The fabric needs to stay very tight. Crackling takes place as the fabric dries. Depending upon the thickness, this can take up to two days. 5) Apply dye with a paint brush.
6) Cover the fabric loosely with plastic and batch for 24 hours.
7)  Rinse, wash with Blue Dawn and dry.

I used this technique to make some of the fabric for my Dyed Fabric quilt.  If you look closely, you can see that the small white squares between each of the blocks is actually white fabric with black crackle. And, the appliqued ribbon in the border of the quilt is the same crackle fabric.

Mini Quilt made to match my Dyed Fabric Quilt


Corn Dextrin:

Corn Dextrin is best for solid areas and lines. Many cool designs can be made by applying the corn dextrin with a squeegee, rubber stamps, stencils, spatulas, or drawing with a squeeze bottle.

1) Corn Dextrin Paste.  Similar to potato dextrin, I mix 1.5 cups of dextrin cold water, heat in the microwave for one minute and allow to cool to about 80 degrees.
2) Tape fabric to a hard surface covered with a thin piece of plastic.
3) Place a stencil on the fabric.  To stabilize the stencil and keep it from moving around I run a glue stick around the edge of the stencil before placing on the fabric.
4) Squeegee a smooth layer of paste onto the the stencil and fabric.
5) Remove the stencil.
6) Allow the cloth to dry completely while it is still stretched.
7) Apply dye with a paint brush or spray bottle
8) Cover the fabric loosely with plastic and batch for 24 hours.
7)  Rinse, wash with Blue Dawn and dry.


I have plans to use these fabrics in a bed runner.  But, it may be a while before I finish making all the fabrics for that.

Dyeing Silk Fabric

Silk — elegant, versatile and washable. Yes, washable! Sewing and dyeing silk was something I wanted to try.
Silk is a natural protein fiber (like wool) that is taken from the cocoon of the silkworm. Most animal protein fibers require acidic dyes which are different than the alkaline dyes that plant fibers like cotton require. However, silk is less sensitive to high pH than other animal fibers, which makes it the most versatile of all fibers for dyeing.
Silk can be dyed with acid dyes (specifically made for animal fibers), but it can also be dyed with fiber reactive dyes (such as Procion dyes).
Looking over the many approaches for dyeing silk, I decided I did not want to invest in yet another set of dye powders.  So, I looked for directions that used the Procion MX dyes I already had.  I found two different dyeing methods to try.

Soda Ash Dyeing

Similar to dyeing cotton, silk can be dyed using the soda ash method.  With this method, the soda ash acts as a mordant to bind the dye to the fabric. The only drawback to this method is that the soda ash is alkaline and thus will make the silk slightly less shiny and not as crisp. While others may find the loss of the crisp silk texture a disadvantage, I actually prefer softer fabrics for making quilts, garments and other household items.
Steps:
1) Soda Ash Solution – 1 teaspoon salt, 1 teaspoon soda ash in one cup distilled water.
2) Make Dye solution by diluting 100 mg of powdered dye in 50 ml Soda Ash Solution.  Mix well.
3) Add 5″ x 5″ fabric square.
4) Cover and store at RT for 3 hours.
5) Rinse, wash with Blue Dawn and dry.

Vinegar Dyeing

To avoid the loss of shine, fabric can be exposed to an alkaline solution for only a short period of time.  Thus to dye the fabric, an acidic dye solution is needed. Vinegar contains 5% acetic acid and as an acid it will bind the dye to the fabric. But, to lock the dye, the fabric requires heat.
Steps:
1) Soak 5″ x 5″ fabric square in Distilled White Vinegar for 10 minutes.
2) Make Dye solution by diluting 100 mg of powdered dye in 50 ml Vinegar.  Mix well.
3) Place fabric and dye in microwave safe container and cover with plastic wrap.
     Note: do not use dyeing containers for food preparation
4) Microwave for 30 seconds, wait two minutes, and microwave 30 seconds again.
5) Cool for 5 minutes.
6) Rinse, wash with Blue Dawn and dry.

Gradation Dyeing

I liked this second method – its fast and creates beautiful colors.  Here are the samples created using 2 mg/ml and 0.2 mg/ml dye solutions.

Now I need to figure out what to make with these truly beautiful pieces of silk fabric I have dyed!

Vinegar Dyeing of Cotton?

I liked the vinegar method for dyeing silk because it was really fast.  So, if it works for silk – will it work for cotton?  Sadly, the answer is No.  The results show that the dye intensity is only about 10 percent of the intensity created with the soda ash solution.  This should not have surprised me since cotton is a plant fiber not a protein fiber.  But, it was worth a try.

Fabric Dyeing


I love fabrics, especially unique, one of the kind fabrics.  So, about a year ago, I took a class on Craftsy called “The Art of Cloth Dyeing” with Jane Dunnewold.  I was fascinated, purchased a sample kit and gave it a try.  I was hooked!  I loved the results and decided to do more. 

Traditional fabric dyeing, which uses a large volume of water and lots of stirring, creates a smooth uniform appearance to the fabric. If multiple colors are used together, the dyes mix and become “muddy”. 
I prefer the results obtained with low water immersion dyeing.  This technique requires less time and uses as little water as possible.  Since the fabric is not stirred, the appearance is less uniform, with a resulting scrunch or crackle effect. 
Supplies Needed:
100% Cotton Fabric
Procion MX dye
Soda Ash (sodium carbonate, dye fixer)
Salt
Non-softened water (or Distilled water)
Mask
Gloves
Measuring cup and spoons
Assorted containers (plastic, glass, or stainless steel, not aluminum or iron)
Blue Dawn dish soap

Instructions
Fabric can be purchased as PFD – prepared for dyeing.  Alternatively, white cotton fabric can be washed in soda ash to remove any chemicals from the manufacturing process. Pro Chemical Company and Dharma Trading Company carry a variety of fabrics that work well for dyeing and quilting.  I have found that Quilter’s Cotton Sateen dyes well and has a softer feel than some of the other fabrics. For creating my test swatches, I cut 6” x 6” squares that were placed in disposable plastic cups.


I purchased my original dyes from Pro Chem.  The dye solution is made by adding 1 tsp soda ash and 1 tsp salt to 1 cup water and heating for 2 minutes in the microwave (to 110 degrees). From my most recent experiences, sea salt creates more vivid color than normal table salt. 

Using a mask and gloves, the amount of dye to be added to the water is measured. Be aware that soda ash is a color fixative.  So, do not dissolve the dye powder in the dye solution until you are ready to use it. Pro Chem lists their dyes by the number of teaspoons per pound of fabric.  For more flexibility and greater accuracy, I set out to determine the number of milligrams of dye needed per milliliter of dye solution.  Below is a photo of my intensity dyeing. 


Each swatch was soaked (“batched”) in 50 milliliters of dye solution for 24 hours. The excess dye was removed by rinsing in cool water, followed by washing in hot water. Dyeing instructions suggest using a detergent called Synthrapol in the wash cycle to remove any unattached dye from the fabric.  Blue Dawn dish soap works just as well, is easier to obtain, and costs less.

I have small metric scale and graduated cylinder for greater accuracy in setting up these dyeing experiments.  If you do not have a metric scale, I can give you some guidelines.  I cup is a bit more that 200 milliliters.  And, 1 teaspoon of dye weighs approximately 200 milligrams.  So, for the fabric swatch that was soaked in 5 mg/ml, you can dissolve 1¼ teaspoon of dye powder in ¼ cup dye solution and the results should be similar.
The cost of the supplies can really add up.  Pro Chem carries over 135 different colors of dye.  I originally only purchased a few dyes (two reds, two yellows and two blues) and created my own recipes for the other colors I wanted.  Below are the photos of my gradation dyeing experiments using 2mg/ml of dye and 0.1 mg/ml of dye.  I now have the recipe to create a wide variety of colors.


To be able to refer to these “recipes” for future projects, fabric swatch pages were made by neatly mounting a 2”x4” piece of each color to a piece of poster board and storing them in a notebook.  What to do with the left over fabric?  Make a quilt!  Below is the quilt I made from the fabric that was not used in my swatch book.